Monday, 7 March 2016

Regency Gown for a Historical Picnic!

When the lovely Ellen (sharpscissors on Instagram, who just happened to be the sender of my awesome chronically vintage secret Santa last Christmas) Announced she was organising a Picnic in Sydney for all lovers of Historical Fashion, I just new I had to attend! At first I was really hoping to make an elaborate 17th century ensemble, complete with stays, chemise, petticoat and dress. However, time got away from me, and I knew I wasn't going to be able to pull that off. My Plan B was to make a regency gown using Butterick 6074 (Plan C was to go in something 40's or 50's from my wardrobe)

I had bought a blue and cream print doona cover from an op shop some time ago, and unpicked it to use one side on the test version of my next multi-size graded PDF home journal pattern (which I still haven't finished) I had the other side sitting about, and even though I don't know if you see many Regency era clothes in floral print, I just thought it would work.

After a quick look, I did find quite a lot of similar looking prints used in films based in the regency era, specifically Jane Austen related movies, so I was happy with my choice, even if my print is a bit larger and less subtle.


So I got to work and began cutting out. I knew I wasn't going to have enough of this fabric to use the skirt pieces from the pattern, so I had to get a little creative with my cutting. I just used some cheap white cotton poplin for the bodice lining, and cut the bodice and sleeve pieces from one of the shorter sides of the piece of floral fabric. With the remaining length, I cut it to the length I needed (45") then with the remaining rectangle of fabric (which was about 12 " wide) that I cut off the bottom, I shortened it to a 45" length (keeping that little scrap for later) then with my 45" x 12" rectangle, I folded it diagonally and cut it so I was left with 2 triangles. I then sewed the 2 triangles together with the smallest points at the top (leaving a few inches open for the back opening, and trimming the bottom edges) and sewed the big skirt rectangle to either side of my triangular pieces, giving me a skirt with a sort of gusset thing happening at the back. I figured this was the best was to give myself more width at the hemline for ease of walking and sitting.

Here is a rough diagram of my cutting layout for anyone else trying to cut a regency gown out of a sheet/quilt cover. It also includes my bonnet pieces

My cutting diagram

Construction of the bodice wasn't anything special, I just followed the pattern instructions. It was however the first time I have ever used prick stitching, which was used to create the drawstring channel along the neckline. For the drawstring, I used more of the vintage blue binding that I used on the , which I machine sewed closed. This will be the only bit of machine stitching that is outwardly visible, but I just couldn't bring my self to hand sew it all. Perhaps I will fix that at a later date.

Neckline detail/bodice and pattern
Once I had the skirt attached to the bodice (but no sleeves) I took a quick selfie in the spare bedroom.

At this point, it just kinda looks like a
 nightie...
But I soldiered on with the project anyway, attaching the cute puffy sleeves and adding binding to the hemline.

Yay Sleeves! With binding on the sleeve
cuffs and hemline

When all that was left to on my dress was a huge mountain of hand sewing, My thoughts turned to headwear. I had a bit of a look around online at different bonnets, caps, coifs, etc. While I really liked the look of some of the straw hat conversions I came across, I really just wanted to use supplies from my stash, and I did not have a straw hat I was willing to cut up, nor enough of a contrasting fabric to line it with. So I had a look at sewing patterns for bonnets and coifs and such, and thought, that with enough ingenuity, I would be able to use the few scraps I had to sew a cloth bonnet, with trimming in the matching blue bias, and possibly some lace from a recent op-shop purchase.

I began work on my bonnet, by cutting out a roughly 12" circle from the square of fabric left from my skirt, 2 strips approximately 4" by 20" and 1 brim piece from the scraps from the side I cut my bodice and sleeve pieces from. I then needed to cut another brim piece out of some white cotton poplin, which, while it doesn't match, it is the same as the dress lining, and as it will be the underside of the brim, I don't feel it will detract too much from the look of the bonnet.

To start off, I cut 2 layers of interfacing for the brim section, and while not period accurate, ironed one on to each of the brim pieces to give them both body. I then gathered a piece of lace, that was roughly 3 time the length of my brim, to it's outer length, and pinned it facing in, between the 2 layers with right sides together. all these layers were then sewn, the seam allowance clipped and turned right side out. As the gathered lace made the seam quite bulky, pressing wasn't going to make it sit flat, and I couldn't top stitch with my machine if I wanted to look at least mostly historically accurate, so I used more prick stitching (like what I was used on the dress neckline) to make the seam sit as flat and neat as possible.

Prick stitching the bonnet brim

Once this was done (and the brim was looking pretty cute) I pinned the 2 rectangles, right sides together, either side of the bonnet, along the unfinished edge, and stitched into place. The seam allowance was clipped along the curve, and the 2 band pieces turned right sides out and the seam pressed flat


I used some more of the blue bias and stitched it closed to make 2 ties. Each of these ties were then sewn into each of the short ends of the bonnet band, using a ladder stitch to turn in the ends of the bands and finish them off neatly.


All that was left to do after that, was to attach the circular crown piece. To allow a bit of wearing ease, I cut a slit about 3 inches long in from one edge, then rounded the corners and the end of the slit, and sewed some more of the blue bias binding to conceal the raw edge, as this section would be at the base of the bonnet and not sewn into the band. The rest of the circular piece was then gathered and I used the machine to sew one side of the bonnet band to the gathered crown, then hand stitched then other down, concealing the stitches.


The slit in the back, neatly edged with bias binding

The inside, before hand sewing
inside layer of the band into place


The Completed outfit with Bonnet
And a few close ups of the bonnet:


So all I have to do now is see if I have any contact lenses anywhere (as my glasses are a bit too modern) then I just need to decide how to style my hair and what to wear on my feet.

Oh, and I also have to get to Sydney. Not sure yet if I will take the train or drive.

Anyone else planning on attending the Historical Picnic this weekend?

Dixie

Friday, 26 February 2016

CWA in the paper

A few of you who know me in the real world, may have seen recently that I was in last Wednesday's edition of my local paper, the Cessnock Advertiser.

Read the full write up here

It seems fitting that I was caught sewing, but believe me, it was unintentional! I had simply brought along some hand sewing to put my time to good use while we waited for everyone to arrive, and the other ladies insisted on having it in the photo. It was the finishing touch on the neckline of a dress that I hope to have up on the blog soon.

I have been a member of my local CWA now for about 3 years I think, initially joining when their cooking competition was mentioned in the same paper. I am very happy to announce that this is my 3rd year competing, and while in the past 2 years I have made it through my branch level to the group level, this year I won my section at Group level, and so will be baking and competing at State Level!

To be honest the only reason I've gotten so far is because I've chosen the section that changes every 2 years, so most of the ladies haven't had a chance to perfect their baking over decades! The macarons have certainly been challenging to bake, and I really didn't think I had done very well this time around, as I had a very hard time getting the macarons to set as it was a very humid hot day. I had to take my trays into the air-conditioned lounge room to set them before baking!

So that's all the update I have for you at the moment. I still have a few projects on the run that I will blog about once complete, as well as some knitting I have picked back up after starting last September and then neglecting.

Dixie

Monday, 15 February 2016

A Glimpse in my Vintage Pattern stash

Seeing as I have not been able to post as frequently as I would like to, I thought I might share a bit of eye candy from my Vintage Pattern stash. I have been working on a few projects that I will be sharing with you at a later date, and a few things for Elsie George that I cannot share.

To start off with, here are 3 patterns from an Enid Gilchrist book full of Self-Draft Patterns for Women and Teenagers. While these are the draft at home yourself type pattern, and are only listed in one size, they are fairly simple, should you wish to grade them up or down to other sizes.


As many of you will be aware by now, I love Vintage Australian Home Journals. Here are a couple of the earliest ones from my stash


And here are some assorted patterns in envelopes, including a few home journal patterns, which would have been ordered separately and not come free in one of the magazines. I have again tried to focus on some of the earlier patterns in my stash, mostly being late 40's early 50's


While I certainly don't have a huge vintage pattern stash like some, I have a fairly reasonable size stash. I would say this is about 1/4 of my pre 70's patterns, but of course I have plenty of newer and reproduction patterns as well. Vintage patterns have the added challenge of needing to be graded up, so sometimes it's easy for me to overlook them when deciding on a pattern to sew up, but I will be trying very hard to use more of them this year.

Do you have a favourite from the above patterns? Is there anything you think I should make as part of my vintage pattern pledge?

Dixie

Monday, 8 February 2016

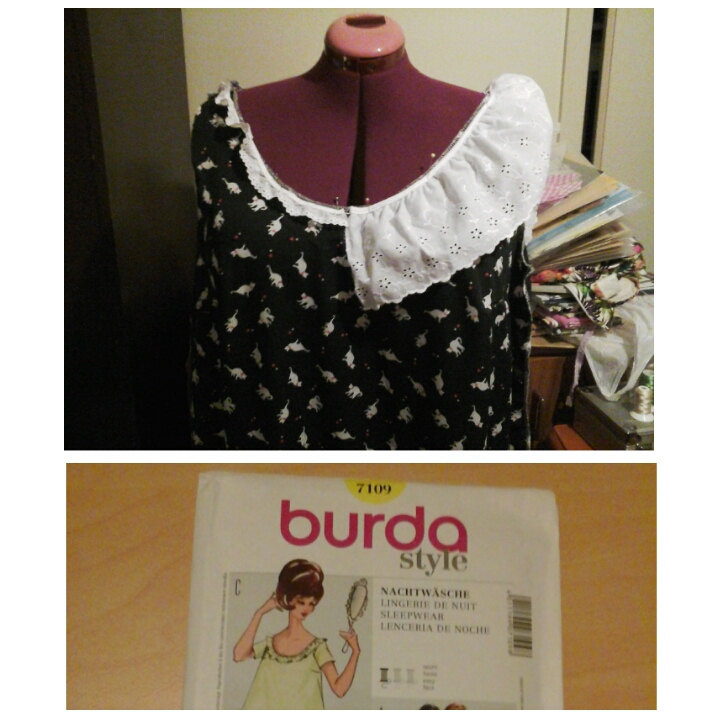
New Jammies! Burda 7109

On my last trip to Spotlight I spotted this adorable pattern in the Burda Catalogue and decided I needed to have it. I still have quite a lot of fabric left from when I bought the drapey black polyester stuff with a print of white cats and hearts for my Valentines day dress last year, and I planned to use some of it to make some cute little pyjamas, but I hadn't got around to doing it, until now.


Luckily, the pattern goes all the way up to a size 24! So I didn't need to grade out the bloomers for my big derrière! Checking the size chart (which unfortunately is not on the envelope, but on the pattern paper) my hip measurement was spot on for the 24, and I chose not to size down like I usually would, as I figured it would be good to have a bit of ease in the shorts. I cut out and sewed up the shorts first and wore them to bed with a singlet top and found them to very comfy. Unlike store bought pyjama shorts, these ones didn't leave my butt cheeks hanging out, and the waistband didn't keep trying to ride up to my naturally high waistline, or twisting around when I rolled over in bed. I really think I need to make a few more!

Finished Bloomers

Gratuitous Crotch Shot

For the top I chose to sew up a size 18 in the sleeveless, top length version with a white lace ruffle on the neckline. It took me a few days to get around to cutting out and sewing the top, as I was not feeling very well, but I got there in the end. When it came to choosing the lace for the neckline, I found 2 suitable options in my lace box, and pinned them both on and asked on facebook for opinions. While a majority of people seemed to like the wider option, a few thought it would be impractical, and even clownish. I really liked the over the top look of the wider lace, but I did end up trimming approx 1 inch from the gathered edge, then I gathered and attached it to the neckline, sewing bias on over the top. I figured cutting off the original binding from the lace would reduce bulk in the long run.


Fabric Close up

Top laid out

Dart and armhole binding detail shot

Neckline detail shot

I doubt you'll be getting any modelled shots of these, so here are a couple of selfies, one at night before going to bed and the other one when I woke up in the morning.

Just before bed

First thing in the morning
All in all I am super pleased with how these pyjamas turned out. They are very comfy to wear and sleep in, and cute to boot!

While out running errands today, I scored a whole heap of assorted lace for only $5 from one of my local op shops, so I'm well and truly stocked up for any more pyjamas or nighties I might make!


Anyone else been doing some practical sewing lately? Or found any good op shop finds?

Dixie

Tuesday, 2 February 2016

2016 Vintage Pattern Pledge

So after only pledging to make 4 last year, and finishing up with 6 (not including any made from reproduction patterns or fabric which hadn't come from my stash) I have decided to go a little more ambitious this year and I have pledged to make up 10 of my Vintage patterns. I bought and was gifted quite a few vintage patterns and Australian Home Journals, So I have plenty of Vintage Patterns to choose from.


Perhaps I'll finally make up the cute collared shirt from this Australian Home Journal? I have been getting much more practice with buttonholes, and I do need more seperates, so this will be a strong contender to get sewn this year. I previously used this Home Journal to sew the dress in the center for the Kurri Kurri Nostalgia Festival


I received this great simplicity pattern from one of my Secret Santa's this Christmas just past, and think it will make a perfect winter work dress if made up in a nice heavier weight fabric


Speaking of Work attire, I still really want to make this pattern up for myself. I made it up for the lovely Rachel who owns Elsie George Boutique, and graded the pattern up to fit me, but my cats got on my cutting table and shredded up my graded pattern (not the original thank goodness) so I lost the motivation to work on this project, but hopefully I will get back to it this year and have a spiffy new suit to wear to work.


I picked up this Pattern sometime in 2015 (from Ebay I think) that is almost my size, so will require very little grading, with the intention of making some easy to throw on sensible workwear. I am seeing a bit of a pattern here, I obviously need more suitable work wear. even though my boss doesn't mind me wearing my brightly coloured, full skirted dresses in the office, sometimes I think it would be good to have some slightly more appropriate Vintagey options to wear (like my 2 versions of Butterick B6094)


I am in the process of grading this pattern into a multi-size pattern, and will be testing it out in my size very soon, so this will probably my first Vintage Pledge for 2016. I had a bit of trouble deciding how to grade the front bodice piece, so I will be definitely be testing it before scanning and sharing the pattern.

I know from last Me-Made-May I still need more separates, office wear, outerwear and pyjamas to make my me-made wardrobe more functional, so I will endeavour to fill those wardrobe gaps with some of my Vintage pledge makes 

Who else has signed up?

Dixie