Oh Look, more Marilyn Monroe inspiration......
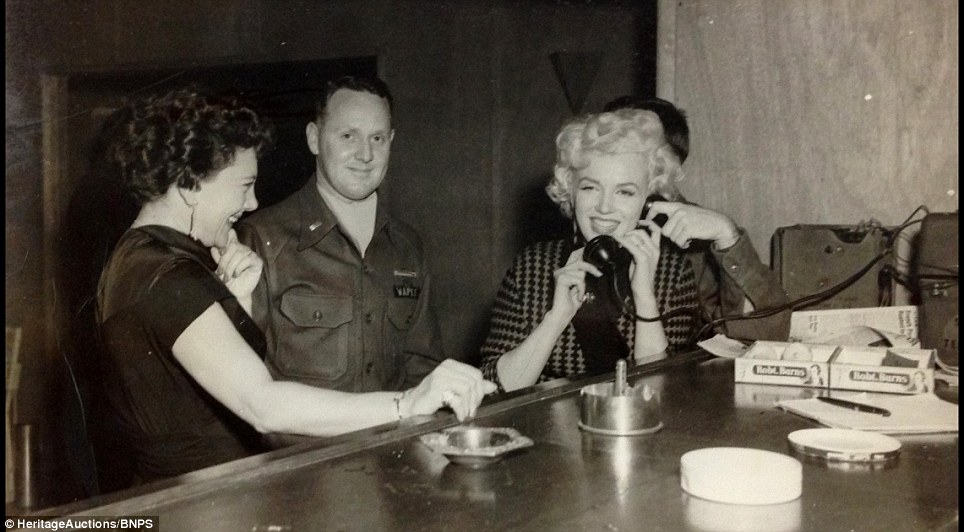
This time I am looking at the black and brown check dress that Travilla designed for her to wear in "Gentlemen prefer blondes" and that she also wore during her trip to Korea..... And then I'm making it.....
I was only able to find one photo of her trip to Korea that was in colour, and it is in the book "Dressing Marilyn" so I have a feeling that maybe this photo was recoloured just for this book? I'm not sure, but every other photo of her wearing this dress during her trip to Korea, taken by a military photographer, is in black and white.
While I don't have the exact fabric to reproduce this dress, I have had some stretchy brown houndstooth fabric put aside for some time, that I thought would work great for a pretty similar looking dress. And now seemed like a good time to finally create it!
Looking at photos, and also obsessively re-watching those scenes of the movie, I deduced that the sleeves are cut on kimono style 5/8 length sleeves. The front bodice has bust darts to the side seams and also to the waist seam. The back bodice has a center back seam (possibly with a zip?) and a dart to the waist on each side. The skirt has side and back seams and 2 darts on the front and 2 on the back, and no split or kick pleat anywhere along the hem.
I can't tell what fabric the collar is made of, though I assume it would be wool like the rest of the dress. For the sake of stash-busting and using what I have, I'm going to use some black ribbing for my collar, and also use it to create a matching belt.
To begin creating a pattern for this dress, rather than draft from scratch, I am going to trace parts and combine a few patterns to create what I need. For the bodice, I start with me graded up bodice pieces from
Simplicity 3107, as it has the correct bust darts, then draft on some generous sized cut on sleeves (as I can take them in later, but it's hard to add extra fabric if needed) For the neckline, I just free hand a nice V neck shape.
 |
| The Fabric |
 |
| Bodice Pieces |
For the skirt pieces, I just used the pattern pieces from Butterick B6094 leaving off the facing section for the back split. I left the collar piece until later, so I could determine exactly where I wanted the neckline to sit, and how long I needed to cut the collar piece.
Once the main pieces have been cut out, the construction is as simple as sewing the darts in each piece, overlocking the edges, sewing the shoulder and side seams on the bodice, sewing the side seams on the skirt, then sewing the skirt to the bodice, the back seam ans then the hems. I was initially going to put a back zip in, but as with any stretch garment I make, I basted the back seam and tried it on, and decided I didn't need it. I didn't remember to take any progress photos of the construction up to this point, but it was all pretty straightforward.
At this point I tried on the dress with an elastic belt, and a piece of ribbing pinned along the neckline. I initially cut a piece of ribbing 9 inches wide (so 4 1/2 folded)
But after pinning it on, decided it was too wide, so folded in 2 1/2 inches and pinned it on again. I trimmed off 1 1/2 inches, leaving a 1/2 inch seam allowance.
While still wearing the dress, I pinned along the edge of where I had the ribbing pinned. I then carefully took it off, and used the pins to trim away the excess from the neckline
I then sewed up one edge of the ribbing with right sides together, turned it right sides out and sewed it along the neckline. The 2 ends were then hand stitched in place, which I forgot to photograph while I did it.
In the movie, Marilyn's belt appears to be made of something like a satin, with a metal clasp, but in the interest of comfort, and using materials I already had on hand, I've decided to use the same ribbing from the neckline, some elastic and this vintage pearly white belt buckle. I cut a piece of the ribbing a little bit more than twice the length of the inside of the buckle.
Then cut the loop of ribbing open, laid it flat and cut 3 lengths of elastic the same length as the ribbing (hint, if you want to make a belt this way, cut your elastic later) Luckily this width of elastic was pretty much exactly 1/3 of the length of the inside of the buckle.
I sewed the ribbing right sides together into a tube. In hindsight, I think I probably should have sewn it on my sewing machine first, then the overlocker, as I overlocked it first, and I think that caused it to stretch out quite a bit.
Turn the tube right sides out
I then pressed the tube flat, which I didn't photograph. My original plan was to sew channels down the length of the belt for the 3 lengths of elastic, but I then realised, straight stitching would break when stretched, zig zag would take up too much space, and triple stretch stitching seemed like a waste of thread. So instead I decided to sew the lengths of elastic together with a zig zag stitch to create one wide piece of elastic.
I then inserted the elastic into the ribbing tube. Here's when I realised I should have cut my elastic after sewing the ribbing. At first I was just going to leave it as it was, because when it was being worn, the wrinkles would stretch out anyway, but then I figured it would fit better with the added length anyway, so I cut some extra elastic and added it onto the end.
To attach the buckle, I cut a tiny hole through the belt with my snips, and threaded the belt through the buckle, with the prong going through the hole. At which point I realised I was not going to be able to fit that through a sewing machine, so I hand stitched it in place
At the other end of the belt, I inserted 3 grommets.
And here's what it looks like on my Dolly. Keeping in mind her bust and hips aren't as full as mine, so I've actually had to pull some of the excess fabric in at the back. All in all I am really happy how this dress has turned out. I've had this fabric put aside for this project for quite some time, and I finally got the motivation to make it, and it only took a little more than one day to sew up, and probably could've taken less time if I didn't take so many breaks.
I was just going to post this with just the mannequin photo, but then my husband and I decided to go into Newcastle for the day for a bit of shopping and to visit his brother, so here are a couple of selfies of me wearing it!
 |
| In the morning before make up... |
 |
| Just now when we got home... |
I'm also thinking it would be awesome to do a shoot in this dress with a military style jacket and attempt to recreate some of those photos of Marilyn in Korea.
Anyone else been doing any Marilyn reproduction sewing lately?
Dixie