Monday, 14 December 2015

Sun Frock Sew-Along Round up!

Now that everyone has had a chance to sew up their frocks, I am very pleased to show you all the results!

First finished (before me even) was the delightful Vicki from Rayon Dreams in a cheesecake world who is also the lady behind the wonderful Those Darn Sew and Sews facebook group. She made this version out of a very cute arrow print fabric and chose to opt for a zipper closure in back for this first dress, then make a second one with the button option. You can read about the arrow print dress on her blog here.


For Vicki's second frock she went with a lovely floral fabric that was very reminiscent of the prints found on vintage feedsacks


Second speediest to finish was the lovely Dee, who had us all going crazy over her beautiful self covered buttons.


Dee also chose to make a second frock out of a cheerful Christmas print cotton, as her Christmas dress for this year (and who doesn't love a good Christmas dress?)


As the deadline loomed closer, more and more frocks were getting sewn up, and we saw progress photos of quite a few in our sew-along facebook group. It was quite exciting to see all the different colour/print combos being used, all over the world, from my humble little graded pattern.

The rest of the frocks, in no particular order:

Bianca from Vintage on Tap made a divine version in a muted pink satin which she blogged about here


And she even attempted bound button holes! Didn't they turn out fab?


Andrea made a picture perfect frock using a lovely floral fabric with contrast piping detail.


Leila didn't think she would get any wear out of a sun frock as it is winter where she lives, so she used the skirt and pocket pattern pieces to make this luxurious velvet skirt.


Kacy of Miss Kacy Sews made a gorgeous version in a aqua/teal polka dot fabric! She decided to take hers in a bit as she prefers her dresses a bit more figure hugging.


Jenna really showed off and altered hers to have buttons all the way down one side. To make this even more impressive, this was her first time sewing a dress!


Kate from Vintage in a Modern World, braved the cold Canada weather and snapped these photos of her lovely floral frock. Everything except the trim came from her stash, so it's a double win!


Paula made this cute version with a lovely ric rac accent near the hemline that had us all swooning.


Kristy-Rae made hers using a vintage sheet, and even had enough left over for her daughter to make herself a crop top as well!


Sarah rocked this cool colour combination, that has me looking at the yellow fabrics in my stash in a whole new way.


Alyssa changed her skirt pieces to make the most of this stunning Hawaiian border print fabric she was lucky enough to be given by her Aunt


Elinor went for block colours with her dress and finished up with this fierce purple creation.


Triselda accomplished many firsts with this pattern, it was her first go at sewing a dress, first buttonholes and first vintage pattern. She used a thrifted floral Vintage sheet for fabric and vintage lace for the trim, which has resulted in this absolutely charming dress


Wenche is in Norway and says it's too dark and cold to wear her dress out for pictures, but here it is on her mannequin. Made from an adorable red printed cotton, I just love that she used polka dot fabric for the piping! Plus she even used piping int he straps.


Maxine got her photo done in the nick of time. She straightened the edge of the trim (eliminating those tricky scallops) and used a tie made of a tube of the same fabric to bring in the waist for this cute look.


A bunch of girls involved in the sew-along have now decided to have an informal shirtwaister sew-along, the group for which can be found here if you wish to join. I am hoping to have time to sew a pink and white gingham for myself in the new year

And now that the Sew-Along has officially ended, I'm sorry to say I will not be sending out the pattern for free anymore. But never fear, I have listed it in my Etsy Shop for a measly US$2! So if you have been waiting to see everyone else's creations before getting the pattern for yourself, you can find it here


Also, as a reward to all those who finished their dress before the extended deadline of December 14th, I am halfway through grading up and scanning in another pattern for them all to have for free. This time one that is a bit more seasonally appropriate for my friends in colder climates, even if it would be too warm to wear here this time of year. When the PDF is finished I will also have it listed on Etsy, also for the low low price of US$2! Due to how busy this time of year can be, I may not get the pattern completed until after Christmas.

And now I really must get back to sewing Christmas presents and attempting to clean the house up ready for having visitors over.

Dixie

Tuesday, 8 December 2015

REMIX the Stitch tour with Golden Rippy

Meet the bloggers who will REMIX the Stitch for Golden Rippy's 2nd Anniversary! They have some fun mash-ups in store for you. Here's the full line-up, in case you missed a day. Don't forget to check them out and send some love!
Don't forget to enter the EPIC Pattern giveaway! Our wonderful sponsors have graciously offered a free pattern of choice to the winner. That's 15 patterns in total!! You don't want to miss a chance to win this!  a Rafflecopter giveaway


As a celebration of the 2nd birthday of the indie pattern brand Golden Rippy, a few sewing bloggers were asked to join in on a Remix the Stitch tour, paying homage to the patterns that they have released over the past 2 years. I was lucky enough to be one of the chosen, and have decided to ambitiously attempt a Mash-up of the flirty Calrose Skirt and the cute Delilah Top.

Seperately, these are both great patterns, and the perfect introduction to working with knit fabrics, so I thought, why not combine them both into one cute, easy to wear dress?

So if you are wanting to attempt the same here's how I did it.


But first, a photo of my boy who thought taking a nap on my cutting table while I taped together the patterns was a good idea


For my fabric I chose to go with a super comfy easy to wear red shirt weight jersey that I had in my stash. While I occasionally feel overwhelmed by the sheer amount of fabric in my stash, it certainly has it's perks! You could totally do this mash up using a firmer stretch fabric for the skirt portion (like a stretch cotton sateen) combined with a softer stretch (like jersey) for the top, especially if you like the colour-blocking look.


I went for the short sleeve version of the Delilah top and cropped it to a length of 17 inches from the shoulder seams, curving in to a length of just under 10 inches from the bottom on the neckline of the front and 14.5 inches from the neckline on the back. As my bust measures 44" I cut the size XL which is supposed to be for a 41-43" bust, but is a relaxed fit, so I figured I could get away with it. If you are unsure what length you need to cut for your top, leave it a few inches longer than you think and you can trim it later. I measured down from my shoulder over my bust down to where I think the waistband will sit (so a bit of guesswork there) then used the waistband piece to approximate the curve that I need. I ended up cutting both of the top pieces with an extra inch at the bottom, just in case.

Cut the skirt pieces for the Calrose skirt as you normally would. For me, this usually entails cutting a larger size for the hips and going down a few sizes for the waist line. As my measurements put me at a size 20 for my hips and a 16 for my waist, and this pattern doesn't feature darts, I have decided to add a few in, rather than have such a pronounced curve on the side seam, as that most likely wouldn't sit very flat. So I've cut the hips at a 20, the waist at an 18, and have added narrow darts to take in the extra size at the waist.


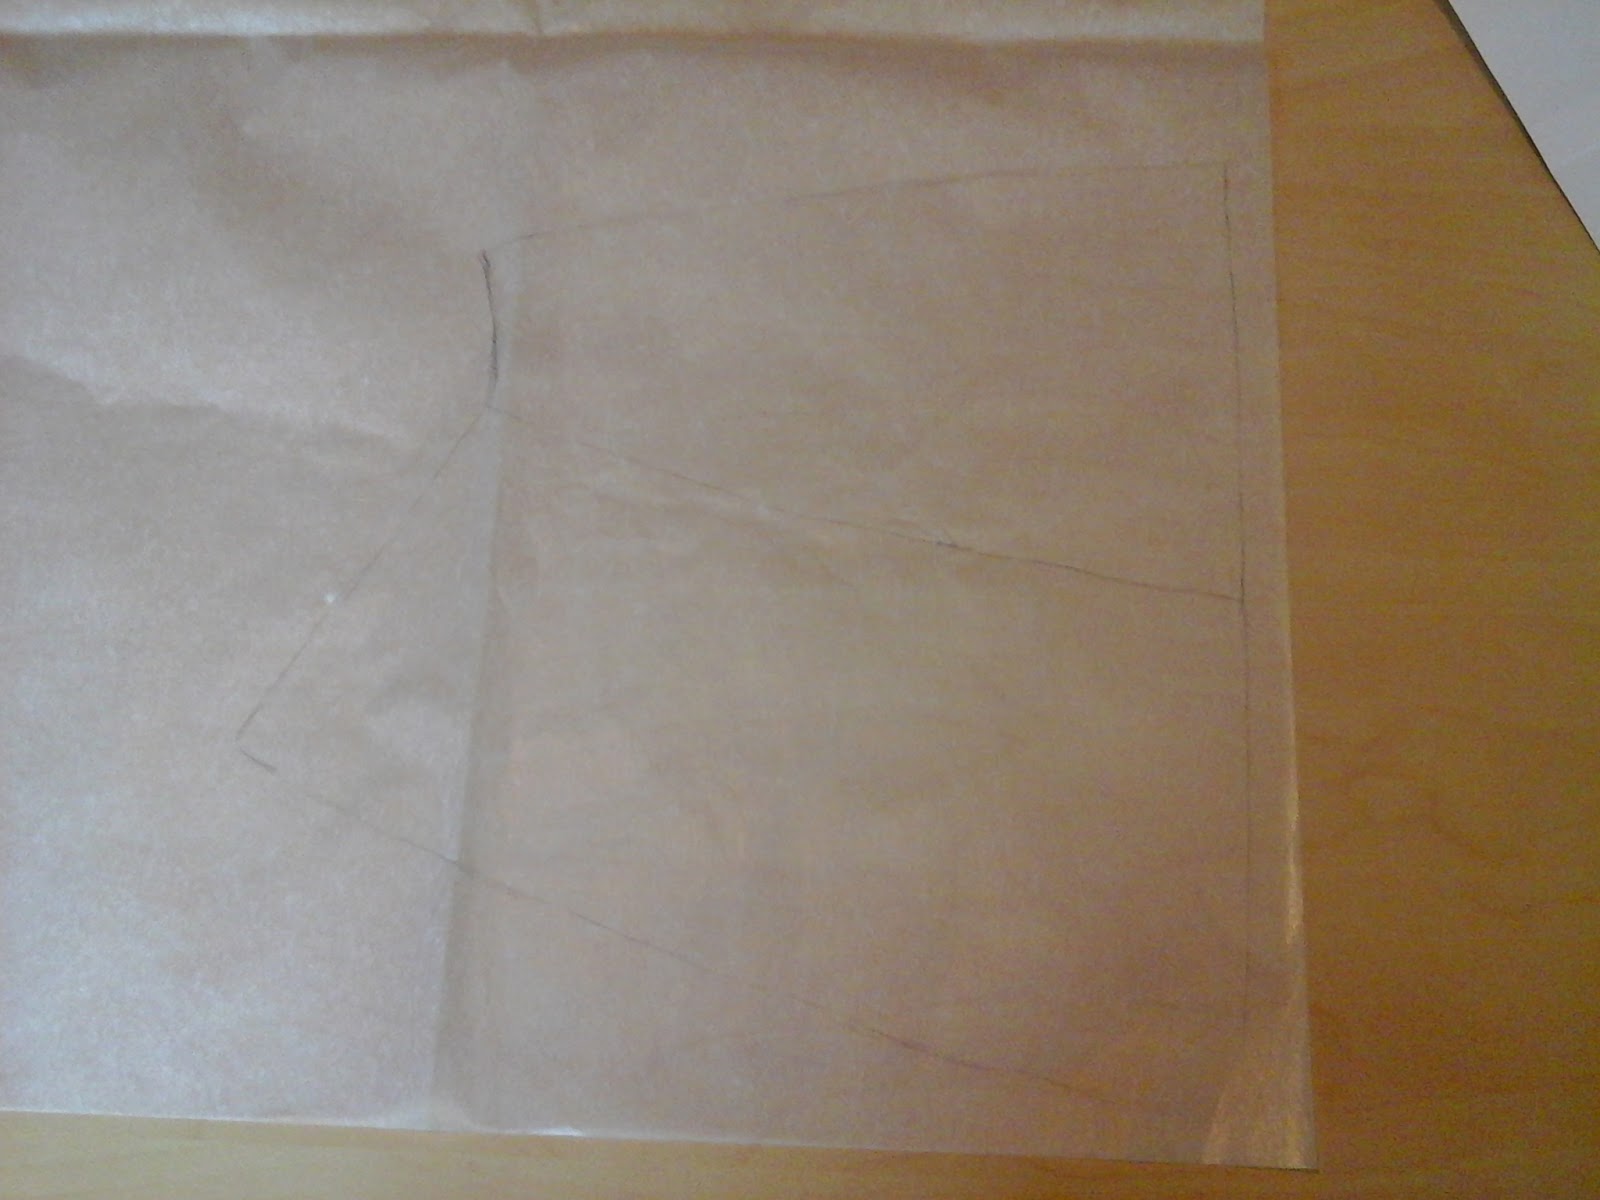
Now for the waistband, which is going to be the trickiest part of this pattern hack/mash-up, but is the part that brings the whole thing together. Grab your waistband pattern pieces and some tracing paper to make your new pattern piece with. First of all take your front waistband piece and trace it.


Freehand a short line up from the side seam in a slight curve, going out slightly, but not as far out as the bottom of the waistband. This needs to go out slightly as this waistband will now be sitting slightly above your natural waistline, up towards your underbust area. Draw a straight line up from the top of other side of the pattern piece, roughly doubling its depth.


Then flip your pattern piece up so that the curve is now at the top rather than the bottom and use it as a guide


I moved it to a slightly different angle to help with this part.


And you have 1 completed waistband pattern piece.


Repeat the previous steps for the back waistband piece, then cut your waistband pieces from your fabric.

Normally with a dress I would work from the top down, but for this one, I am going to sew the skirt together first, then the top and then sew them together at the waist. This is so I can check the fit every step of the way. Once I know the pattern fits well, I would construct both the front and back separately, then sew them together down the side seams.


So firstly, darts in the skirt pieces, pressed to the centre, then sew the front waistband piece to the front skirt piece, and the back waistband piece to the back skirt piece. If your like me and overlock everything, overlock the waistband seams now and press.


Then grab your front and back and sew them together up the sides seams. Try on and check the fit, make alterations if needed, then when it's all good, overlock and press the seams. Put aside for later.


At this point I was running a bit behind, so I didn't take any more progress photos. I sewed up the top as per the pattern instructions, then ran a gathering stitch along the curved bottom edge. Once I gathered it in I stitched it to the top of the waistband using a triple stretch stitch, and hemmed the skirt using a zig zag stitch.


It's quite late at night, so I can only give you a dodgy mannequin photo for now, but I will do my best to take some proper ones and edit them into this post. It does look a million times better on than it does on my wonky mannequin, it even has a slight Joan Holloway look to it.

Anyway, I have thoroughly enjoyed working with these Golden Rippy patterns, the fit is pretty spot on and the instructions are so easy to understand. If you are looking for new PDF patterns, then I urge you to try a Golden Rippy pattern, I promise you will love it!

Dixie

Friday, 4 December 2015

A Christmas Elf Costume for a Record Breaking Attempt

So my little hometown has decided to attempt to get into the Guinness book of Records, by breaking a previously set record and going for the 'Most People Dressed as Christmas Elves in the One Place'

I had really hoped to get this dress finished and this post up long before now, but I've been quite unwell with my Asthma playing up (a few local bushfires certainly weren't helping) but luckily I have finished it just in time.

I am not one to buy and wear store bought costumes. Life is too short of crap quality and bad fitting clothes, even when it comes to costumes. And so I decided to sew my own Christmas Elf Costume! I picked up 2 pieces of red stretch velvet from the remnant bin at spotlight last visit, and I had some scraps of green panne velvet from a 1940's dress that I have been working on (that is sitting in the naughty corner at the moment) I thought, why not use my 1949 Sun Frock pattern again? It only took some slight alterations to be made into a perfect Christmas Elf dress pattern. I am no longer offering my graded version of this pattern for free, but you can get it for a measly US$2 from Etsy.

Initial plans

So, for those of you with the pattern, here's how I transformed it into a Christmas Elf dress pattern.

Firstly, I am making this dress in a stretch fabric, and I want it fitted, so I will be making a few sizes smaller than the size chart says, as the original dress is for a loose fit. I am a 44 inch bust, but for this, will use the 40 inch bust size. I will also be removing the excess overlap for the buttons at the back, and using a zip closure instead. To do this, I fold away 1 1/2 inches from the centre back edges. (perhaps more, but I can always cut away extra later)

Next I grab my Trim pieces, and some tissue or tracing paper. Trace the pattern pieces out, adding triangular points along the bottom edge.


I cut the trim from my scraps of green, and my bodice, pockets and skirt pieces from my red.


For the skirt, I initially thought I would only have enough fabric for a wiggle skirt, but with some careful cutting, I managed to cut out what will be almost a 1/2 circle, slightly shorter skirt than I would normally wear, but still long enough to be decent. I was going to do a jagged hemline on the wiggle skirt option, but now that I am making a 1/2 circle, I will just leave it as a straight hem, otherwise it would look odd with a petticoat

I began just like I did for my Sew-Along dress, by sewing the darts and overlocking around the edges of all my pieces. As this is a stretch fabric I will be sewing all the seams with either a Zigzag stitch or a triple stretch stitch on my machine.

After the darts, its on to the side seams for the bodice, then a quick fitting to check everything is working how I planned it.


I decided to just leave the pockets plain, so I just cut out 4 squares of the red velvet, sewed each one right sides together, leaving a gap to turn back through, then put aside until I got to the skirt.

Leaving the skirt for later at the moment, I moved onto the trim pieces, As I am not even attempting piping on this version (on those points, are you kidding?) I just sewed the side seams, then laid the 2 sides, right sides together and sewed. As Velvet has a pile/nap to it, it's best to use plenty of pins to hold it together, otherwise it will shift around and not line up properly. All of the corners were then clipped and the trim was turned right side out.


As the panne velvet is quite flimsy and difficult to work with compared to the cotton I used for my Sun Frock, I simply pinned the trim with it's right side against the wrong side of the bodice, sewed, clipped the curves and flipped it the right way out.


It was at this point I realised I had forgotten to cut out and sew in my shoulder straps. So I unpicked the 4 points the straps attach to, cut 2 straps out of my leftover red velvet, sewed them into tubes, turned right side out and sewed them into the gaps I had unpicked.


The side seams for the skirt were then sewn, and the skirt was sewn to the bodice, using a secure triple stretch stitch. Then to finish up the dress, all it needed was a back seam and zip, a hem and the pockets top stitched onto the skirt. I couldn't find a zip in an appropriate colour, so I just ran a basting stitch up the back to see if it had enough stretch to slip on over my head, and it did! So I reinforced that seam, them hemmed the skirt. At this point it was 11pm, so I decided to leave the pockets for now, and do them in the morning if I had time. I did try the dress on, and realised the skirt would not quite be full enough to wear a petticoat with. Bugger, but oh well, it still looks cute!


Luckily, I got myself into gear this morning and managed to get the pockets on! I pinned them on while the dress was on Dolly, then quickly top stitched them on while drinking my cup of tea.


I was in too much of a rush to get a completed photo on Dolly, but I will try to get photos of it on me tonight.

Voila, the perfect vintage inspired elf costume, from a 1949 Sun Frock pattern!

Now to buy a set of elf ears and elf hat (which I would've liked to make if I had the time) whip up a belt at lunch time, and get ready to break a World Record!

Dixie

*Update*
Here's a photo of me all dressed up, and a photo of the group. Don't know yet if we managed to set a world record, but I will keep you updated!