In an attempt to give my wardrobe some more wintery weight,office friendly, non-pink clothing, I decided to make my own version of Gertie's Butterick B6094 using a gorgeous heavy weight red tartan sheet, with plain red cotton for the contrast lining.
As with any time I go to use a store bought pattern, I did a bit of a google to see if I could find other blogger's who had sewn it, to see if there were any problems they had with the fit of it. I found this
lovely version made with a contrast fabric for the waistband. While she doesn't go much into construction details, I appreciated seeing the slim skirt option made and worn on a curvy girl.
And
Lucky Lucille's version looked equally fabulous, she used a different skirt (which looks to be a 1/2 circle skirt, with pockets!) for a more casual look. She also lowered the neckline slightly, which I often do as well, so kept that in mind. The pattern calls for a bodice lining AND a facing, which seemed like overkill to me. On Lucky Lucille's version, she opted to just use the facing. As I was making mine out of a slightly heavier weight fabric, I decided to fully line my dress, but leave out the facings.
So I got started pinning the pattern to cut out, and Princey decided to help.
I picked him up off the table 3 times, but he just kept jumping back up. So I removed the pattern from under him and let him supervise.
While I usually cut a size 18 in Butterick patterns, I decided to cut the bodice out in a size 20, to allow a slightly roomier fit. As I was making the slim skirted option, and my hips are a bit bigger proportionally to the rest of me, I cut the skirt pieces at a size 20 at the waist, but then graded out to 1 inch past the size 22 line at the hips on each pattern piece. This allowed a few inches of ease at the hips, allowing for "spread" when I sit.
The construction was pretty simple. firstly the darts in the front bodice pieces, then attaching the waistband, then the front section to the 2 back sections, and repeat for the lining pieces. the outer and the lining were then sewn together, turned right side out and pressed. I then sewed the darts in all the skirt pieces, sewed the front skirt piece to the back skirt pieces (and the same for the lining) The Skirt outer and skirt lining were then sewn to the bodice outer and bodice lining respectively and the centre back seams were sewn, up to the point where the zip would start, and pressed open
The shoulder seams were then handsewn together and a zip was sewn into the centre back of the outer fabric. I then hand stitched the lining fabric to the zip to give a lovely looking finish to the inside of my garment. each side of the back vent was sewn flat and a 2" hem was pressed in the outer fabric, and finished off with a blind hem stitch on my machine (Which I've just discovered, and it's fabulous!) The skirt lining was trimmed a bit shorter and hemmed with a 1/2" top stitched hem. To attempt to keep the lining in place and not have it peeking out through the back vent, I hand stitched a few tacking stitches down the centre back seam and either side of the back vent, through both the outer and lining pieces.
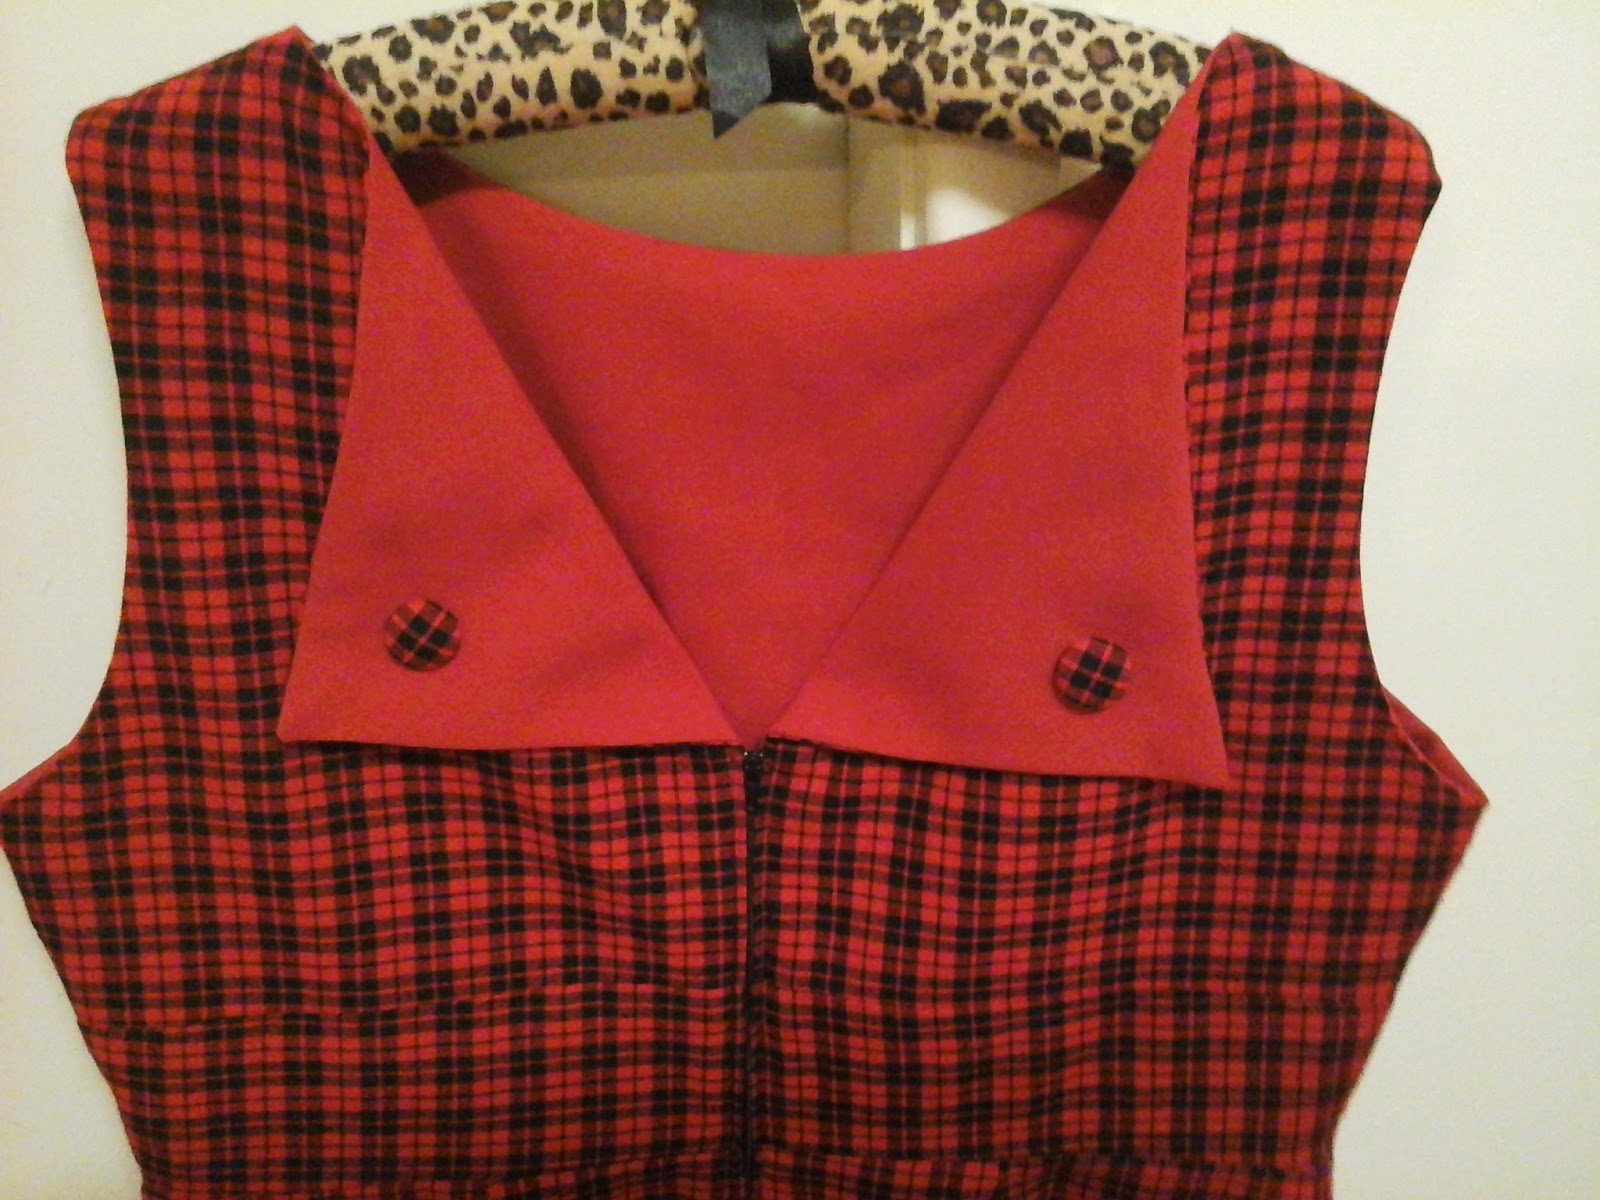
The Finishing touch was 2 fabric covered buttons, 1 on each of the flaps on the back of the dress, made with the same red tartan fabric as the outer of my dress. I admit, I didn't get these done right away, and wore the dress quite a few times without them, I was just too impatient.
 |
| Self Cover Buttons |
 |
| There is a template on the back (Which I just measured) |
 |
| Run a gathering stitch around the edge of the fabric circle |
 |
Pull in the gathering stitches, tie off and push the locking
washer thing in place, an you have 2 cute fabric covered buttons! |
I hand sewed the buttons on while sitting having a chat with my mum at her place. I didn't measure them, just went by eye, so I think they may have ended up a little bit wonky, but I don't think it is very noticeable when it's worn
 |
| Back of the Dress |
 |
| Mabel tried to help |
 |
| Close up (see, just a bit wonky) |
 |
| Front of the dress |
Some how the front pieces didnt quite line up like they were supposed to, so the pattern doesn't quite flow from the bodice piece to the waistband piece (but the waistband and skirt match up at the centre front, thankfully)
This dress has already proven to be a perfect dress to wear to the office, especially for winter (but it will still get a lot of wear in Autumn and Spring I think) Because it is sleeveless, it make it easy to wear with my heavy winter coats (without fighting to keep the sleeves unbunched within the coat sleeves) and lighter cardigans (or both!)
And here's something for you all to look forward to, I'm working on my next free PDF pattern!
 |
| Tracing pieces onto A4 sheets for scanning |
Dixie
*Edit* here are some photos of it on! Excuse the tiredness, lack of lipstick and the 2 day old rag curls. I wore this to work today, and managed to convince hubby to snap a few pics for me when I got home just now.


I am currently making this dress with the circle skirt option. I am only lining the bodice because the skirt requires 8(!) yards of lining!
ReplyDeleteI am using a floral print in cotton. And it seems relatively easy, but I'm a novice sewer, I've been working on this in a class two hours a week for the last 5 weeks. Not even near close to finished!!
I wouldn't bother lining the skirt if I was making the circle skirt option either. Everything seems to take longer in a class, but once you get the hang of it, you should be able to whip it together easily next time :)
DeleteThat tartan fabric was made for this dress! It was simply living a lie as a sheet until now. You've done such a wonderful job on this dress and it looks just the thing for Winter.
ReplyDeleteKatie @ Katie Writes Stuff
Thanks Katie. I agree with you! The weight of the fabric was strange for a sheet, as it is not as soft as a flannel winter sheet, but it is perfect for this dress. I think it's going to be worn until it falls apart :)
DeleteVery, very cute. And perfect for the office! Great job!
ReplyDeleteThanks Kacy!
DeleteWow, this style really suits you. Love it!
ReplyDeleteNaomi
teenyboppinalong.blogspot.com
Thanks Naomi! I wear mostly 50's (with some 40's and 60's) style, but I usually stick with full skirts, to avoid fitting around my hips, but I think this silhouette is much more appropriate for my day job.
Delete