Wednesday, 21 October 2015

THAT White Dress.... (Construction details)

So I needed a white outfit for a White themed party. I had searched through my wardrobe, all the local op shops, as well as the local clothing stores and found nothing I liked.

And then my friend innocently suggested, why don't I make a replica of Marilyn Monroe's iconic White dress from the Seven Year Itch.

I admit it has been something that I have wanted to make for a long time, but have put off, partly due to the effort that would be needed for the pleating, and partly because there are already so many shoddy versions of this dress out there, that I didn't want to try until I could give it the time and effort it deserved to get as accurate as possible.

I do however have this book, Sew Iconic, which contains a pattern for the dress.


At first, I was pretty happy with this version, as it has the pleating and the multiple belt/ties at the midriff, so was a lot better than some other patterns to begin with. But I still ended up nearly redrafting the whole thing, to make it the way I wanted, but found it to be a pretty good base. I was initially pretty hesitant, as I couldn't find much in the way of reviews of the pattern itself, plenty on the book, but not how the patterns went together, but spent some time looking over the pattern, as well as pictures of the original dress and decided to go ahead, making changes as I went.

First up, the arduous task of tracing out the pattern pieces from the large, overlapped pattern sheets. This was awkward and time consuming, but not very difficult, as each line is made up of the initials of the actress who's dress it was, making it easy to discern between pattern pieces.


Next up is the grading up. This might seem like a drawback to purchasing this book, as all the patterns are one size, but as I am use to grading up my vintage patterns, this one was no different for me.

At this point I hadn't actually chosen a fabric..... I had nothing suitable in my stash, and couldn't find anything in town (I scoured the op-shops and even tried the sewing emporium to see if it was open, nope) Luckily, Lincraft was having a 50% off dress fabric sale, so everything hung on whether I could find some suitable fabric at Lincraft after work on Thursday (a mere 8 days out from the party! I decided on a lovely drapey georgette, that was only slightly sheer. which worked out at only $4.99p/m.


After looking very hard at many photos of the dress and at the pattern, I realised this pattern was actually only a basic circle skirt with pleats pressed in for decoration, the waist;line is not actually pleated when it is sewn up. Photos of the Travilla dress clearly show that the skirt was indeed pleated, so a regular circle skirt just wasn't going to cut it for me. It is very hard to tell if the dress was actually a circle skirt, as the pleats do not seem to get drastically wider at the hem of the dress, and in Travilla's pattern notes he does write "half circle skirt sunburst". Even though pleating a circle skirt seemed a bit daunting, I was worried that if I did make it a half circle skirt, that it just wouldn't have that delicious swishy-ness of the original dress, I mean what if by "half circle skirt sunburst" he just meant the pattern piece, and it was actually made with 2 of those pattern pieces? So I went with a large circle skirt, with a waist measurement 2 times my own, to pleat it in on itself. Travilla's notes mention that the skirt was 39" (although I now think that may have been the radius of the circle before the waist was cut from it) So to get a skirt 39" long with a waist measurement of about 72", I had to cut 2 semi-circles with a radius of 50 inches!!! Now as I hadn't thought all this out before buying my fabric, I only purchased 3m (the pattern calls for 2.5) so after cutting out only 1 side of my circle skirt, I ran out of fabric and had to make another dash to Lincraft to buy more. Normally I plan these things out better, but being in such a rush, I didn't think things through thoroughly, and this is what happens, wasted time and fuel.


After getting both the front and back skirt pieces cut out, I turned my hand to the bodice pieces. From the original pattern, I Increased the width of each by about 3-4 inches, increasing the underarm section so that it wrapped further around the body than the one from the pattern. This pattern calls for gathering on the bodice pieces, but I really wanted the pleated look of the original dress from the movie, so I marked where I wanted the pleats and folded my pattern piece into pleats as a test. I quickly realised I needed more coverage on the underarm side of the bodice, and I also needed to extend the top of the piece to reach around to the back of my neck.


I began pleating the bodice pieces first, which was a complete nightmare, as they were small pleats, starting at 1/4 inch at the top and becoming 1/2 inch at the bottom. As the pleats were slight sunburst pleats, this meant most of them were not on the grain, so it took a lot of pins to hold them in place.


Each side was then pressed to set the pleats, using a solution of 1 part white vinegar and 4 parts water. I usually use a spray bottle of this solution when setting pleats, but when I tested this on a scrap, it caused a few little brown marks on the fabric. To resolve this issue, I had the solution in a bowl and dipped a pressing cloth, or in my case a scrap of white cotton, which I then wrung out as best I could and laid over the pleats and pressed with the iron on a wool setting. I pressed the first side with the pins still in the fabric, but this has unfortunately left the pinholes in the fabric. For the rest of the pleating I removed the pins in small sections as I went, and re-pinned the pleats only in key areas to keep all the pleats neat.

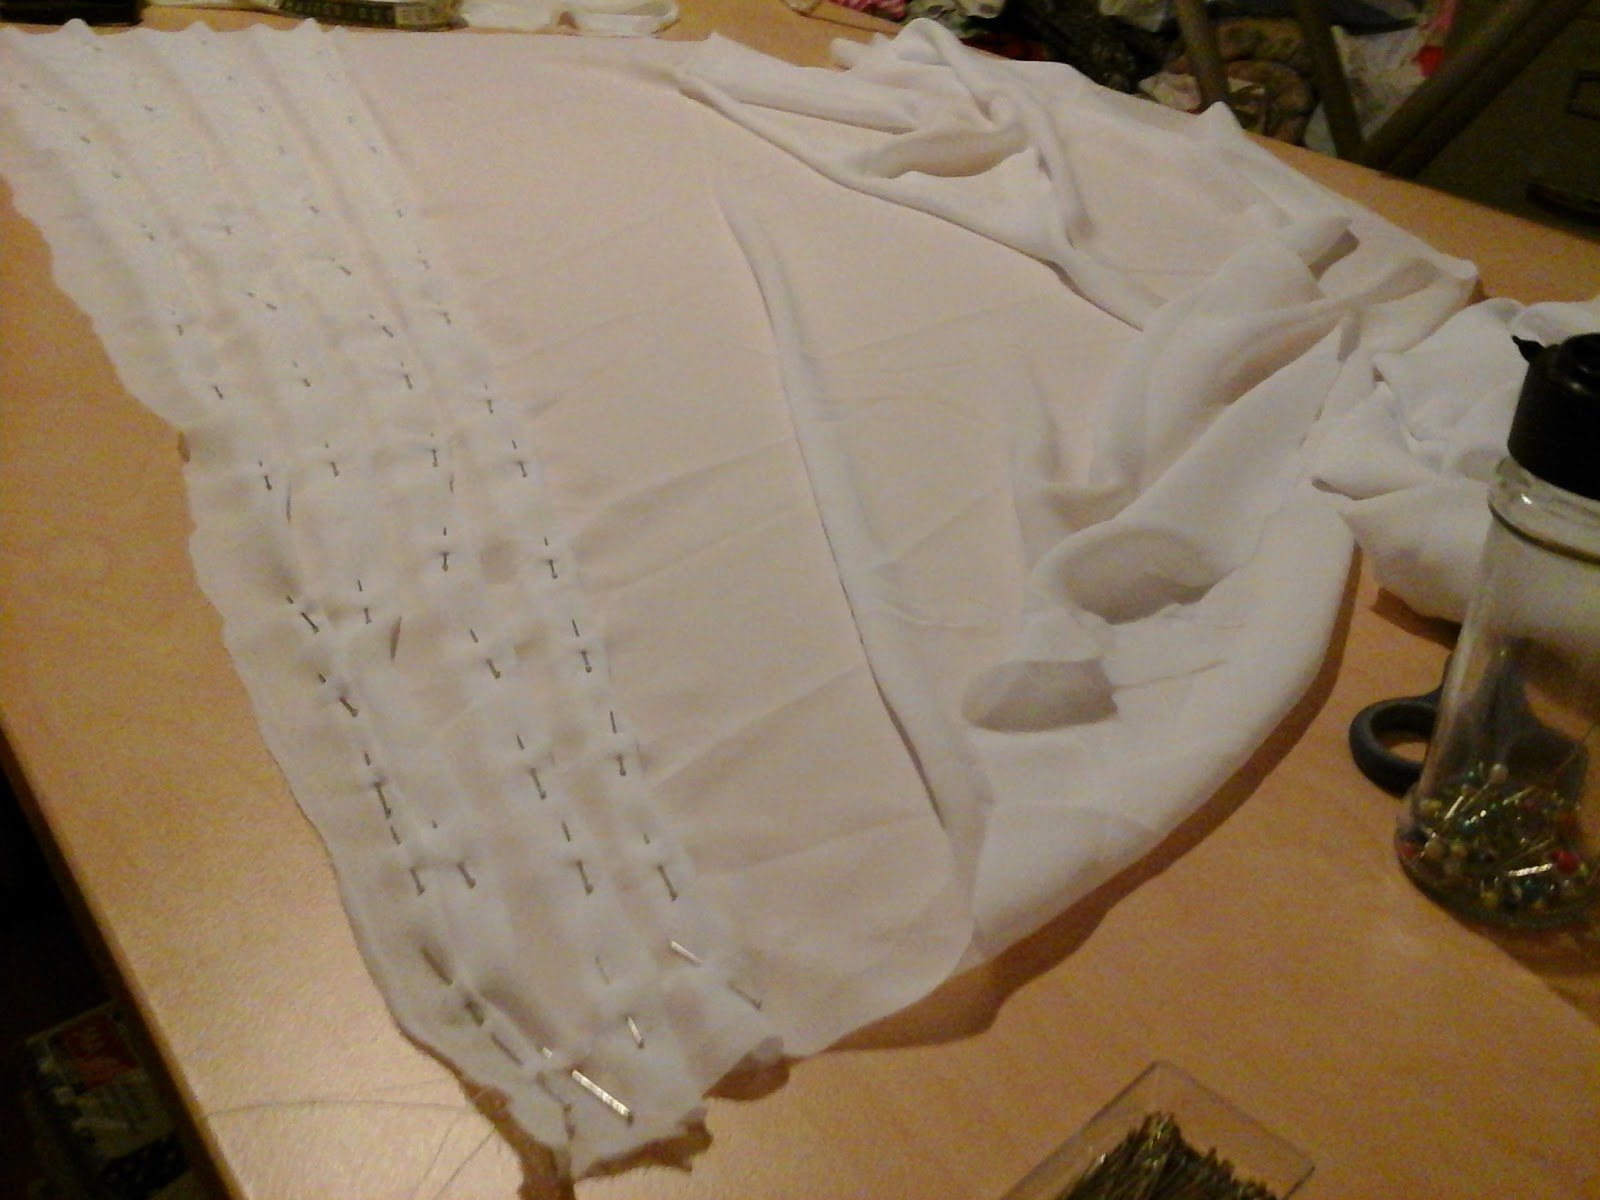

The pleating of the skirt pieces was a long arduous process, Using up nearly all of the brand new packet of 200 pins I had purchased for this project. I was initially going to try to measure everything and make the pleats as even as possible, but due to the bias movement of the georgette, that just wasn't going to work. Instead, I folded my skirt pieces lengthways a few times and pressed lightly to give me a few guiding sunburst lines, then proceeded to make the pleats in the fabric by eye. The pleats were supposed to be smaller at the skirt top, but things didn't quite work out that way, so when the skirt needed to be shortened a bit (as it ended up much too long) I shortened from the top of the skirt pieces so that they would fit around my waist without having to let out any pleats.


Here is one of the back skirt pieces half pressed, showing the drastic difference in the fabric once it is pressed.


Once I had sewn the Bodice pieces to the bodice lining pieces (which I had hand drafted off the pleated bodice piece) and pinned both sides to the mannequin I was really happy with how it was turning out.


In order to get that really Marilyn-esque shape, I chose to add in a reasonably strong, tight, boned corset-like waistband. For this I used some leftover satin from my wedding dress, as well as a scrap of plastic boning and bias tape for boning channels. I had originally thought to include a waist-stay, but ended up not bothering with it.


As for the pattern for the waistband, I thought the easiest option was just to cut down the pattern pieces from my wedding dress, which were already cut down pattern pieces from Butterick B5605. I just measured from under my bust down to my waist and added seam allowance and cut that length from the pattern pieces, shortening slightly at the back.


I used the same fabric for the lining and the outer, with the boning channels sewn to the outer layer. 


Once the bodice pieces and skirt pieces were sewn to the waistband, I put the dress on the mannequin and tied a ribbon around the waist to have a look at the silhoette, and I was pretty pleased.


Strips of georgette then had to be sewn into long tubes, turned right side out and pressed, then cut to length and pinned and hand stitched to the dress, securing the pleats down, with the occasional stitch going right through the underlying corset waistband.


Once I finished the hand sewing I tried it on and took this quick selfie (I think it was around midnight) That waistband pulls me in nicely at the waist, which gives a very Marilyn-esque silhouette


Then the next day I did the hem and she looked like this. I unfortunately didn't pull the ties tight enough around the dress as I was hand sewing, so the end result looks a little puckered, but I can always unpick and fix that at a later date.


I just could not get the fabric to behave enough to turn the hem up twice, so I had to overlock the edge and just turn it up the once. However, I think that is a detail that only I am really going to ever notice.

I finished the dress on the Wednesday night, before leaving for the cruise on the Friday afternoon, Leaving only the Thursday evening to pack my bag. As I was packing my bag, I decided I needed a protective garment bag for the dress so it wouldn't get dirty or crushed, so I whipped up a quick one out of only slightly more than 1 meter of a lovely floral vintage cotton, that I knew wouldn't leech colour onto the dress. I think it only took me less than an hour to sew, and was a great use of a small amount (not enough for a dress) of vintage fabric.


The garment bag ended up being just a bit short for this particular dress, so I won't be storing it in it in my cupboard, but was great for taking it with me on my cruise. Despite carrying it slung over my arm for the train journey and taxi ride to White Bay on a hot sweaty day, the dress inside was still perfectly wrinkle free when I took it out to wear later that night. This is probably mostly due to my fabric selection. I have since gently machine washed it at home, and the georgette was still wrinkle free and crisply pleated when I took it out from the washing machine and hung it up to dry. The same could not be said for the cheap satin lining of the bust pieces, but you can't see that anyway.


The Vintage floral fabric looks much nicer hanging over my arm than some ugly plastic garment bag. I may have to write up a tutorial to make garment bags sometime in the future.

I was hoping to have some decent photos of me wearing the White Dress before posting this, however it has already turned into quite a long post, so when I get them done I will just make a separate post.

Dixie O'Dare

Sunday, 18 October 2015

Sun Frock Sew-Along Part 1

Welcome to Part 1 of my Sew-Along!!!

Quick links to Part 2, Part 3 and Part 4 

Hopefully by now you have all received your pattern by email, if I have missed you or you haven't signed up yet, just shoot me an email at dixieodare@gmail.com

This week we will be working on Pattern preparation and alteration, selecting fabric and notions.

Pattern Preparation. In the interest of making this pattern as similar to regular sizing as I can, I have not already done my usual alterations to a pattern, and so will be making these alterations along with you guys as we go. I have made these sizings to have 1 inch of wearing ease, so if you like things more fitted or less fitted, you can decide to go up or down a size, or even half a size.

So our sizes are 34, 36, 38, 40, 42, 44 and 46 which means the finished garment measurements for the bust will be 35, 37, 39, 41, 43, 45 and 47. The original pattern was for a 36" bust (not 34" like I said in my previous post) so I have graded down one size to a 34" and graded up to one size above my size which I usually grade up to, so we have up to a 46" bust, which I think should cover most ladies. I apologize to those out of this size range, but it is a fairly simple design if you wish to try your hand at grading for yourself.

If you are particularly short waisted, like myself, you will need to remove some of the length of the bodice pieces. I usually always need to take off 1 - 1.5 inches of length off any modern patterns, so for this one I am removing 1 inch in length. To make this alteration to your pattern piece, you cut through the middle of your pattern piece and overlap them by 1" and tape into place.


Alternatively, you could just fold your pattern piece with a 1/2" fold. You will need to do this to both your front and back bodice pieces.


If you are long waisted, you will need to do the opposite, by cutting through the middle of the pattern piece and spreading the top and bottom apart. Use another piece of paper underneath to fill in the gap and sticky tape down.


If you normally need to do a FBA, as this is such a simple pattern, I would recommend using the next size up of the front bodice piece, and making the dart deeper at the waist. For a SBA use the next size down and make the dart shallower at the waist. If you do use a bigger or smaller size bodice front, make sure you cut the corresponding size of bodice front trim.

Ditto for the skirt pieces. If you are particularly short or tall, please check the skirt length before you cut. This Skirt is drafted to be 27" long when finished. Just add or cut off length at the bottom of the skirt to suit your measurements (desired length, plus 2" for seam and hem allowance) Now if you are particularly endowed in the booty/hips area like me, you may wish to add more volume to your skirt pieces, as this is a fairly simple A-line skirt. I will be adding a bit extra width to make mine closer to a 1/2 circle skirt.


Lastly, before you can cut you fabric, you need to think about your back fastening. This Pattern includes enough space at the back for an overlapping button closure. If you would rather a Zip closure at the back, you will need to remove some of the width at the center back seam, however, this can be left until after the bodice is constructed and the fit checked if you prefer, you will also not need to cut out the back facing piece.

Now for fabric and notion selection. As this is a sundress, I think it really lends itself to a nice light cotton, however, this is really down to your own personal preference. This dress would also look quite fetching in a satin with contrasting trim, or a heavier fabric if you live in a cooler climate. You will also need some bias tape, piping cord and a few buttons to coordinate with your fabric. 1.5-2m of each of the bias tape and piping cord will be more than enough, and the amount of buttons will depend on their size. If they are quite large you could get away with 3 or 4, but if they are smaller you may need up to 8. I wouldn't recommend very small buttons for this dress,  as larger buttons are needed  to balance the 2" button overlap. If you do wish to use buttons on the smaller side, you may want to reduce the width of this overlap section. You may also wish to put a few hooks and eyes or snap fasteners in the skirt closure, or even a zip.


Next week we will be discussing pre-washing your fabric and cutting out your pattern from your fabric. If you do wish to make a muslin, and the pattern makes sense to you, you can go ahead and do that now, or wait for the next post.

Dixie

Thursday, 15 October 2015

P & O comedy cruise

So some of you may know already, but this weekend past I took my Mum away for the weekend on a 3 night P & O Comedy Cruise.

Naturally, I thought this Marilyn reproduction outfit was well suited to boarding the cruise ship.


For those of you not aware, this is my version of the outfit Marilyn Monroe wore whilst boarding the cruise ship in the movie "Gentlemen Prefer Blondes"


There were many Selfies taken, and much Wine and Cocktails drunk.


The first night was the White Party, for which I made a version of the Famous White Dress that Marilyn Monroe wore in the movie "The seven year itch" Which looked ridiculously good, and had everyone calling me Marilyn for the rest of the cruise! I didn't get any good photos of the dress on the night, so I will have some taken and show you all when I post about the dress's construction.

*UPDATE* I have posted about the Construction of my version of the white dress, but have not yet had any decent photos of it taken.


Our room was pretty spacious, as we were upgraded to a wheelchair access room (more room for our fat bums!)

Please excuse the mess and the reflection of me in my pyjamas in the mirror


The next day was pretty sunny, so we rocked our sunhats, and took more selfies.


I was looking particularly attractive at this moment......


The Second night was the Gatsby Party, which was fun, but much more like a modern night club than anything else.


We watched nearly all the comedy shows (except the Hypnotist) and Colin Lane was by far my Favourite. But all the comedians were hilarious.


We even got up ridiculously early to have breakfast on the deck as we sailed under the Harbour Bridge.


Seriously, I am talking 5:30am


We passed under the Bridge at 6am


And took the obligatory selfie


All in all, we had a Fabulous time! I highly recommend a 3 night cruise for anyone who isn't sure they will like cruising, as it is just long enough to sample nearly everything the ship has to offer, without spending too much time away if you have other commitments, or can't quite handle the movement of the boat. Most of the cruising brands offer sampler cruises like this, but P & O certainly have the most departures available throughout the year.

And now, back to reality!

Dixie

PS More details on the Sew-Along coming soon! I have almost finished with the Pattern PDF

Wednesday, 14 October 2015

Announcing A Sew-Along!!!!

I know we are getting into a pretty busy time of year, but it was one of my blog goals for 2015 to host my own sew-along, so I figure now is better than closer to Christmas! Also Frocktober seemed a suitable time to sew a new Frock.

On offer to all my lovely readers for the Sew-along is an exclusive, specially graded version of this beautiful Sun Frock from the October 1949 of the Australian Women's Home Journal.


The original pattern is for a 36" bust which is roughly an Australian size 10 and I have graded up to a 44" for myself which is about an 18. From there it was pretty simple to grade to all the sizes in between, as well as one size down (34") and one more size up (46"). I have not yet digitised any patterns, so this one will also be hand drawn. While I am happy to give you the pattern for FREE for the duration of the Sew-Along, the catch is that it will not be posted on the blog to download, but rather I would like everyone interested in joining the sew-along, or just wanting the pattern to email me at dixieodare@gmail.com and I will personally email each of you with the pattern.

I do ask that you do not email the pattern to others, or sell the digital pattern for your own profit. Should you wish to sell dresses made from the pattern I don't mind, but would love to know.

We will be starting the Sew-Along together on Sunday October 18 and the plan is as follows:

Week 1 - Pattern preparation and Alterations, selecting fabric and notions
Week 2 - Fabric treatment and Cutting out your pattern
Week 3 - Trim and Bodice Construction
Week 4 - Skirt, Pockets and finishing

The Deadline to be included in the round up post is November 30th, so plenty of time to get it done.

I will try my hardest to keep to this schedule, but please forgive me if I fall a little behind, life is like that sometimes.

Of course, you can join in the Sew-Along at any point by emailing me, but the earlier you do, the more time you have to choose your fabric and notions!

Dixie

*Update* As we are a week out from the Sew-Along deadline, I am not not accepting any new participants, sorry! If you still want the pattern, you can buy it from my etsy shop for a measly US$2

Wednesday, 7 October 2015

Prost! A little Oktoberfest

Since attending Oktoberfest in Munich last year while on our Honeymoon, my Husband and I have wanted to throw our own Oktoberfest party at home. Unfortunately time got away from us this year, so we didn't manage to organise a big party, but we did cook a few things from our time at Oktoberfest and had my little brother and his fiance' over to share in our feasting and beer drinking.

Naturally, we had to have some big soft pretzels.
I used Papa Drexler's Bavarian Pretzel recipe, which while it was fiddly and time consuming, created a tasty pretzel. Not exactly like the ones we had over there, but that could just be person who made them.....


Interestingly, this recipe call for the pretzels to be dipped in a water/bicarb mix for about 45 seconds, which isn't something I have done in baking before. I guess it does something to the outside crust of the pretzel or something.


My first few probably weren't rolled out quite long enough, giving a puffy little pretzel as a result, but I got better as I went. I divided the dough into 8 instead of 6, as there would be 4 of us. But then I made a second batch anyway.


I also made some basic little gingerbread hearts using the Gingerbread recipe from the Women's Weekly Big Book of Beautiful Biscuits, and iced them with royal icing in white, green and blue. Despite mine being a lot smaller than the ones at Oktoberfest in Munich, I attempted to ice them with words such as "Oktoberfest" "Liebe" "Bier" and "Prost!". I even did a couple that said "Ich Liebe Bier" (I love beer) which the boys loved.


Another food that we ate while at Oktoberfest were chocolate covered fruit skewers from the carnival food stands. I loved that most of the food stalls were lovely fresh foods, not the pre-packaged junk you get at shows here. Being a bit low on funds lately, meant I was a bit limited so I just used bananas we already had, as well as strawberries which were on special. I made some with a mix, some with just strawberries, some in white chocolate and some in dark chocolate. 


The strawberries with dark chocolate were my favourite!


We also had other foods (Sausages and mini Schnitzels...... ok they were chicken nuggets) but I wanted to get a nice photo of the foods I had made. Except the boys just couldn't help themselves.


And kept taking food while I tried to get a photo (that's only half the pretzels by the way. The rest were behind me on cooling racks)


All in all, everyone enjoyed the food and was absolutely stuffed by the end of the evening. The few gingerbread cookies and fruit skewers that didn't get eaten that evening were gone in the morning (I was hoping to have leftover for work lunches, oh well...) Best of all, most of the ingredients were stuff I already had, so it didn't actuallu cost all that much to do, however I was in the kitchen most of the day, as they were all a bit time consuming.

Hopefully next year we will be in a better position financially and organisationally, so we can throw a big party to share with all our friends.

Dixie

And here is the gingerbread recipe for those of you who aren't fortunate enough to have the Woman's Weekly Big Book of Beautiful Biscuits. I wouldn't ordinarily post something out of a currently published book like this, but a quick google search found that others had already posted this exact recipe, so I figured one more can't hurt
You will need:
125g butter
1/2 cup brown sugar, firmly packed
1 egg yolk
2 1/2 cups plain flour
1 teaspoon bicarbonate of soda
3 teaspoons ground ginger
2 1/2 tablespoons golden syrup  

Royal Icing
1 1/2 cups icing sugar
1 egg white
4 drops of lemon juice (I left this out)
food colouring

Step 1
 Cream butter and sugar until light and fluffy, add egg yolk, beat well. Gradually add sifted dry ingredients and syrup, mix well, knead lightly. Roll between two sheets of greaseproof paper to 3mm thickness. (mine might have been 4-5mm to make them soft fluffy biscuits)

Step 2
Gently remove greaseproof paper from top. Cut out gingerbread figures (or Hearts) with cutter. Remove any excess mixture around the cut-out figures.

Step 3 Lift the figures onto a lined baking tray. Bake in moderate oven 10 minutes. Cool on trays. Spoon royal icing into small plastic bag, snip off one corner to make a piping bag. 

Royal Icing
Sift icing sugar. Beat egg white lightly in a small bowl, using a wooden spoon. Add icing sugar, one tablespoon at a time, beating well after each addition. When icing reaches piping consistency, beat in lemon juice and desired food colouring. Makes about 20.


Wednesday, 23 September 2015

A Scissor-Happy Anne Adams 4769

My latest graded up sample for Elsie George has been this wonderful Anne Adams Pattern from 1954


Whilst ridiculously cute, this pattern is also ridiculously small, for a 29" bust! So some major grading up was needed before I could even begin. Luckily, I had some time to work on that while working at Elsie George last weekend.


To make sure the cute scallop detail didn't get lost, I wanted to make sure I used a plain fabric or a not-too-fussy print. Most of the time I don't buy much plain coloured cotton, usually just 1m or so for contrasts, linings and pockets, so I managed to find this cute cream quilting cotton with a print of yellow-ish scissors that I thought would work great, without taking away from the design details.


Initially I graded up the pattern by adding the difference of the original 29" bust size compared to my 44" bust size, divided into 4, to each of all the bodice pieces (as well as a slight redraft of the neckline/collar pieces) Even though when I measured the original pattern pieces, it seemed that it could fit a 33-34" bust, so my graded up pieces seemed quite a bit too big. I went ahead anyway, figuring I could just take any excess out of the side seams.

The bodice went together fairly easily. I started with the darts in the back piece, then overlocked around most of the pieces (not the scallops or the neckline pieces) The front bodice pieces were then sewn to the back bodice piece and the seams and darts pressed. Both the bodice facing and the front facings (which I had interfaced beforehand) were sewn to the bodice right sides together. To attempt as neat scallops as I could manage, I drew a line 1/2" in from the edge along the whole front edge to stitch along, using very small stitches. I wouldn't say they turned out perfect, but I'm pretty happy with them. I clipped all the curves (a lot) and turned the facings, then pressed them flat.

At this point, pinned on my mannequin the back did look way too large and gapey, but I left it for now. The front neckline pieces were sewn to the back neckline pieces, then the top and bottom were sewn together right sides together, leaving open 2 sections to attach the bodice. Pretty much all the edges around the neckline had to be clipped, then it was turned right side out and pressed. I then gathered up the top edge of the sides of the front of the bodice, leaving the facings free. The facings were then folded back where they went and the top edges all lined up, then pinned into the openings in the neckline pieces. A bit of top stitching around the neckline, and a hem at the bottom, and all I had left was the buttonholes and buttons.

I originally had picked out some much smaller white buttons, but another look in my button jar and I managed to find 5 large, yellow buttons. They are a bit old and scratched up, I think I stole them from my Grandma's Button Jar, and they may have originally come from a dressing gown... BUT they worked perfectly on this dress with the size of the Scallops, and it was exactly the number of buttons that I needed. I tried to be very careful with buttonhole placement, as they are quite large and due to the nature of large buttons, don't sit centered on the button, but rather slide a bit to the side when done up, and I didn't want to be showing skin through the corners of the scallops.

To finish off the ensemble I chose to make a simple gathered skirt, which I have made a million times before. Like always I added side seam pockets, and used a zip in the centre back. I decided to go with a gathered skirt rather than the circle skirt with gathered sections from the pattern, as I was a bit low on fabric, and this works out to be the most economical way to get a full skirt when you have a directional print.

I wore it to work yesterday, and snuck up to Elsie George in my lunch break to snap a couple of selfies in the change room mirror.


Also, BIG NEWS!

I am going to be announcing my first very own Sew-Along! It will be a free graded version of a Vintage Australian Home Journal Pattern, that I hope everyone will love, so keep an eye on my blog for more details soon!

I really hope I will get a few people to join my sew along, so I would love a comment from anyone who is interested. I may even grade the pattern up even more if there is enough interest. At the moment it will be available in bust sizes 34-44".

Dixie