Friday, 22 July 2016

Vintage Suit Sew-Along Progress

Well I started very very late, but I have started! You may remember my inspiration was this lovely light blue suit, worn by the Fabulous Marilyn Monroe in the movie Niagara.


One of the many reasons I had not yet started, was because I have been unable to locate more of the fabric I need. I searched both my local Spotlight's months ago, and was only able to find 1 suiting fabric in a light blue, but unfortunately there was only 1.1m of it left. I have since Looked for the same fabric at any Spotlight store I find myself near, but no such luck, it seems to be a discontinued colour. So I decided to just begin work on the jacket, and if I found more of it at a later date, I could make the matching skirt.

So if anyone is at Spotlight and finds Light Blue Stretch Suiting, please, please let me know!

So anyway, I began by pinning my pattern to my fabric to see if I would actually have enough fabric. I had just enough, I will only have to use my lining fabric for one side of my sleeve cuffs, which I can live with.


After I cut out all my pieces, I used the scraps to cut out squares for bound buttonholes, as well as circles to cover some self-cover buttons. The buttons I found in my stash are a bit different that the ones I usually use that use grooves in the button shank to lock in the back, these ones are just a really really tight fit, so it took a bit of force to get them all done


I began construction by stitching the darts in the front and back bodice pieces, then by marking and sewing the bound buttonholes in the right front side, using the tutorial from Sew Retro Rose. Once the buttonholes were mostly done (just the 2 layers the hand sew together later) I then sewed the shoulder seams together, pinned the side seams and tried it on (then put it on my mannequin) I was pretty happy with the fit so far.


I then stitched the elbow darts in the sleeves and set them in. My pattern has turned out having more fullness at the head of the sleeve than my inspiration, and I initially liked how they turned out, and was going to keep them, but now it's bugging me, so I will probably be unpicking them, trimming the sleeve heads and re-setting them a bit later.


I then turned my efforts to constructing the cuffs and collar. I began by applying interfacing to one side of each, then sewing each of them right sides together along the outside edge. The curves were then clipped and the cuffs and collar turned right side out and pressed. Then I pinned them on the mannequin to see how things were looking. I probably would have been better off with a small shawl collar to get the same look as the Niagara suit, but I think this one will still look pretty cute.


So now I am just working on the facings, and still have to cut out and construct the lining. And of course source fabric for, and make the skirt.

How is everyone else suits coming along?

Dixie

Tuesday, 19 July 2016

Op shop finds

I was super lucky during one of my latest lunch break op shopping adventures to find heaps of mostly Gutermann thread, for only $3 for an assorted bag (I bought 4!)


I also found a few interesting pieces of fabric including the slinky floral, which I used to make a beautiful slip.


I also bought a large print houndstooth fleece type fabric, a few meters of army green jersey, some lovely blue taffeta and a meter of a white crushed velvet.


Over the weekend, I sorted out my existing and new thread spools into 2 colour groupings and put them into 2 glass bowls (as they wouldn't all fit into the 1 anymore) the small bowl is blacks, purples, blues, greens and yellows, the larger bowl contains the whites, beiges, pinks, reds, oranges and browns. While this might not be as practical as a spool rack, I love the way they look, and like digging around to find the perfect colour.


So not a huge haul by any means, but some very useful stuff for a seamstress like me. Anyone else been op-shopping lately?

Dixie

Sunday, 17 July 2016

A Fabulous Floral Slip!

Yesterday, at very short notice, my husband and I drove up to my mum's place to dog sit her great dane cross, Zeek, while she was at work. In the 10 minutes we had to get dressed and get on the road, I grabbed my janome sewing machine, a few patterns and a bag of fabric that I recently purchased from the op shops. I may have left the house wearing my pajamas and a cardigan......

So when I got to my mom's house I had a look at what I had brought with me and chose to use this slinky floral polyeseter that cost me $2, and this pattern Kwik Sew 3395 (which I changed slightly) to make myself a slip.


I had some help from Zeek. I decided to cut the front and back panels on the bias, so my husband took Zeek outside and distracted him so I could cut out on the floor.


I used the pieces for view B of this pattern, but I cut the back bodice piece and skirt piece as one on the bias, and the front midriff and skirt piece as one on the bias, adding approx 12 inches in length. As I didn't have my loop turned with me for the straps, I pulled the top and bottom threads of my machine to a length longer than the straps, and place them within the inside of the folded strap, so that when I had sewed up the edge, I could just pull it through with the thread tail. 


The straps are then sewn inside the cup pieces, which are then turned right side out. I gathered each edge of the outer and lining of each cup separately, so that I could encase the raw edges inside when I attached the front skirt piece. I machine sewed the outer side, then hand sewed the lining down. The back piece was then hemmed at the top edge and french seamed to the front piece at each side. 

I pinned the straps in place at the back where I thought they should sit and tried the slip on. I then shortened the straps by about another inch, then sewed them in place, All that was left to do then was to even up the hemline, turn it up twice, press and stitch in place.

I took these photos today, so excuse the wrinkles from being chucked in a basket, I did press it while sewing it, I swear!


Anyway, I love how it turned out, the only issue is it gapes a little bit at the sides, under the arms, so if I make another, I will make it a little smaller there. Plus there are enough scraps left over that I will probably be able to make a pair of matching panties and bra as well

I can't wait to try it out under a few dresses soon. Has anyone else been sewing slips lately?

Dixie

Tuesday, 12 July 2016

Birthday goodies for my 26th!

So I recently turned 26 (Sunday before last to be exact) and as like previous years, I have treated myself to a small shopping spree to celebrate (this year funded by my wonderful husband) I began by purchasing several pieces of leather from a stall at Winterfest. Leather is not something I would usually go for, being a dead animals skin, but as I delve a little further into historical re-enactment, I've realised it is kind of necessary for certain things such as boots and satchels. During the day at Winterfest, I really felt the main things letting down my outfit were my shoes and bag (and lack of petticoat, but that was just due to time constraints)


So I bought 5 reasonable sized pieces from the $2 a piece scrap bin (a few of which I think may have been there by accident, and actually were small full hides)

From left to right: a long matte black piece which I think will be perfect for belts, a really thick piece of off-white that I intend to use as boot soles, a lovely soft to the touch caramel coloured piece, a kinda stiff chocolate brown leather I thought I would use for boots and a super shiny dark brown piece which might not be suitable for historical stuff, but is quite a large piece, so I couldn't resist


After seeing the Marilyn Monroe Exhibition, my wonderful husband encouraged me to spend up some money at Spotlight, so we found our way to the Bendigo store. I found this interesting flesh coloured stretch mesh with gold and bronze sequins that reminded me a bit of the nude/silver beaded/sequined dress from the movie "Some like it Hot". It was on the sale rack for $20p/m and Spotlight was having a 40% off clearance fabrics, which brought it down to $12p/m. I bought 1.5m as well as half a meter of plain flesh coloured stretch mesh for the neckline.


My other bargains include some oriental crepe which was down to $3.60p/m, some blue printed poly voile down to $1.80p/m, 2 of the Gertie print polyesters down to $3.60p/m and an assortment of velvet ribbons for 10c p/m


I also picked up a few patterns from some op-shops we came across in Bendigo, including some Kwik-Sew patterns that will work nicely for nightgowns, a nice princess seam dress pattern in large sizes, a McCalls Retro pattern, an 80's maternity pattern as well as a smart men's blazer pattern.


I also found another pair of red London Rebel Heels, exactly the same as the pair that I already have, but have almost worn to pieces!


When we finally got back from Bendigo, I had to go by my local post office to pick up a couple of parcels. The first of which was from my Nanna and contained a beautiful sweets plate and serving bowl from Peters of Kensington.


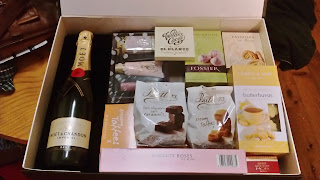
The second was a sumptuous hamper from my Dad and his wife. By the time I took this photo, I had already eaten a box of chocolates from it.....


All in all, between the roadtrip to Bendigo, my shopping and presents, I had a pretty enjoyable birthday. Here's to the next year of my life!

Dixie

Friday, 8 July 2016

Marilyn at Bendigo Art Gallery

For my Birthday this year, I decided I had to go see the Marilyn Monroe Exhibition at Bendigo Art Gallery in Victoria, so my Husband and I went on a roadtrip down south, via Sydney for Winterfest on the way, and Melbourne to pick up a sewing machine for my good friend Beccie, of Sew Retro Rose fame.


Unfortunately, they did not allow photography within the exhibition, and had staff placed all throughout it to make sure nobody did, so I couldn't even manage a few sneaky shots. I would have loved to be able to photograph some of the details from her dresses on display, so instead I took notes. In hindsight, I should have taken a sketchbook. The 2 dresses I spent the most time looking at details of were the nude/silver beaded dress from Some like it Hot, and one of the original Gold Lame dresses from Gentlemen Prefer Blondes. There was a broad range of Marilyn's outfits, with a variety of different movie costumes, as well as many clothes from her personal wardrobe. The White subway dress, while immortalised in the giant statue on display in town, was not in the exhibition, to my dismay. Nevertheless, I frocked up (even though it was about 8 degrees) and posed for a few photos underneath Marilyn's skirt.


This exhibition ends very soon on July 10, so if you have been thinking of seeing it, this weekend will be your last chance!

Dixie

Thursday, 7 July 2016

A quick cloak and coif, and photos of WInterfest

After finishing off my Kirtle and Chemise to wear to Winterfest, I knew I was going to need something to wear over the top, as it was in the middle of winter. So I decided to make myself a cloak, with a faux fur lined hem and hood. I chose this light green/brown fabric from my stash, which I am fairly certain is wool or a wool blend, and some grey white faux fur.

I initially wanted to make the cloak a full circle, and I thought I had enough fabric to do so, but after I cut the first semi-circle, I realised I did not actually have quite enough.

Bummer.

However, I grabbed the piece I had cut, draped it over my shoulders, and realised I could get away with the half circle instead. Which also meant there would be half the hem to attach the fur to. Win win I think. So I then used the leftover corner section from cutting out the semi-circle, and roughly pinned out a hood shape. I checked the measurements against myself, making sure it would be nice and oversized, then cut it out. I also cut 2 strips approx 2" x 14" for ties at the front of the neck. All in all, I used just over 3m of fabric, So I still have about 2.5m left for other projects.

Cutting Diagram:


I began construction by machine sewing the 2 sides of my hood together along the back seam. Once I had sewn it, I then hand sewed each seam allowance down, pressing the seam open and folding under the raw edges. This gives a neat finish, concealing the raw edges, and is also somewhat period correct. I then eased the bottom edge of the hood to the neckline of the cloak body. To neaten this seam, I trimmed the excess allowance from the curved neckline edge, then pressed both seam allowances downwards, folding the seam allowance from the hood section under, concealing both of the raw edges. The front edges of the hood and cloak do not need to be hemmed, as I have utilised the neat selvedge edge of the fabric, which will not fray.

I then used a ladder stitch to fold in the edges of the strips to create the ties.


Then came the messy part

Sewing with Faux Fur!

I began by measuring how long the hemline on the cloak was.

I then cut four 5 inch strips of fur, joining them together at the short ends, ensuring the pile of the fur was all going in the same direction.


Which I then pinned, right sides together, along the hemline. Once it was all pinned, I machine sewed along that edge, then turned the fur to the inside and handstitched up the other edge, trimming the excess from the ends and turning them in to conceal all raw edges.


Then of course I had to try the whole outfit on and see how it looked! These were taken at night, so the lighting isn't great. Also, excuse my blue shoes!


I still haven't added the fur trim to the hood, but I do have just enough left from the hem to do it, so I will probably add it on a bit later. In the end, I am glad I only made this a half circle cloak, as I would have had to cut my fur strips half as wide, which I don't think would have looked as good. Also, it would have made the cloak a fair bit heavier too, and it is already pretty heavy.

As I only have shoulder length hair, I thought it would be difficult to style my hair into a medieval hairstyle, so I thought it would be easier to just shove my hair up into a coif.  I used some calico scraps and this tutorial, which I found through pinterest. The process was very simple, and very similar to my regency bonnet, just without the brim and the bias ties. I used a rectangle 14" by 25" (folded in half lengthways, with a slight curve cut out of the long edges) and a oval-ish circle with a circumference of about 40" and hand stitched the whole thing together during my lunch hour at work, as well as some time that evening while watching a movie with my mother


The ovalish crown is gathered and sewn to the rectangular piece. I sewed one side of the brim to the crown at a time, so that I could encase all the raw edges inside the brim. A good press, then it was ready to go! I divided my hair into 4 sections, which I then plaited and pinned across each other with Bobby pins. This held my hair fairly neatly and flat all day under the coif.

Here is a photo from Winterfest with the brim folded back (and a unicorn)


And another selfie, but this time with the brim unfolded, to keep the sun out of my eyes.


Of course my friends, my husband and I all had lots of fun at Winterfest. They Birds of Prey display was much bigger this year than the last time I attended (way back in 2009) This little guy pictured is Brian, and it was his first show.


Here is Lauren getting to hold Zorro, who is the same bird I had a photo with back in 2009.


Steve having a go at Archery.


Watching the Jousting


I also got to have a go at a few medieval/viking handicrafts, with a re-enactment group from the Blue Mountains. Including Viking wire weaving, loom weaving, drop spinning, fork knitting and more!


Photo by Cliff Dorian

Photo by Cliff Dorian


Lauren and I both managed to win free passes for next year's Winterfest in the Costume Competition, so we will have to make even more impressive outfits for next year's event!

Dixie