Sunday, 27 March 2016

Peasant Top Pattern Hack

So there is this vintage reproduction peasant top that is quite popular with fashion bloggers and people into the vintage fashion scene. I don't think I need to mention the brand, but suffice to say it is a very popular brand. I would love to have some of these tops, one in every colour if I could. Unfortunately my budget can hardly stretch enough to buy one, let alone a dozen or so.

And so I decided to make my own, using an existing peasant top pattern I already owned as the base.

I am using Burda 6791, but nearly any peasant top pattern will work.


Now the good news for all you plus size seamstresses, is that because we are making this top out of a stretch fabric, you need to size down considerably. Which means there's bad news for all you skinny minnies out there, as you will need to grade your pattern down (which is fairly simple with this style of pattern) I usually make about an 18-20 depending on the brand of pattern. For this, I will be using the size 8! Because this pattern is meant for woven fabrics it has a lot of ease in it. The finished garments measurements for the bust is 45 1/4 inches for the size 8. My bust is 44 inches, so this seemed to me like a good size to work with. You can choose what size is best for you based on the finished garment measurements (not the size chart) on the pattern of your choosing.

To start with, I traced the sleeve piece in my chosen size. I decided to shorten it slightly by tracing along the hemming line and using that as my cutting line instead, making my sleeve pattern just under 8 inches long. You can choose a length to suit yourself, but for this style top, I don't think I would go any longer than that.


I also traced the very top part of the front and back pattern pieces. Now this pattern has a very convenient under bust line for the elastic casing, which I am going to use as my seam line, adding 1/2 inch to the bottom edge for seam allowance (which I didn't fit onto the tissue paper pattern, but will add when I cut the fabric) If your pattern doesn't have this line, just roughly measure how long you want the bust piece to be, mine is just under 8 inches long (which made things a little confusing with the sleeves later) If you have small boobs you may want a shorter length, and those ladies who are more well endowed than I will want a bit more length.


Then draft a simple waistband piece. I used the same for the front and back. Use 1/4 of your underbust measurement for the top edge, taper into 1/4 of your waist measurement, then flare out again. If your fabric is particularly stretchy, or you don't have much difference in measurement between your waist and underbust, you could just use 2 rectangles instead.


I chose a light weight stretch fabric from my stash, in a lovely teal colour, that I purchased from an op-shop for $2 (there was plenty left over, perhaps a matching skirt?)


Make sure you cut your pieces with the direction of most stretch going side to side, not up and down.  Here is all my pieces cut out:


Sew the sleeves to the front and back but pieces as per your pattern instructions. I sewed all 4 sleeve seams, then the 2 side seams together, using a zigzag stitch so that the seams could still stretch, then overlocked the seam edges. I then overlocked the neckline edge, folded it over and top stitched with a zig zag, leaving a small bit open, to create an elastic casing. As I only wanted a soft pull of elastic, I decided to go with thin, round hat elastic. 


Using a safety pin to help pull it though, I gathered the neckline into what looked like a good size, and tied off the elastic. I then set my straight stitch to it's longest length and sewed a gathering stitch around the bottom edge of the bust section.


Grab your 2 waist band pieces and sew them right sides together along the side seams. I chose to use a triple stretch stitch for these seams, as this part of the top will be the tightest fitting. I also overlocked along these seams.


Using the bobbin thread of the gathering stitches, pull in the bottom edge of the top section to roughly match the top of the waistband piece (doesn't have to be exact, as you can adjust it as you go) 


Distribute the gathers evenly and pin the top to the waistband, right sides together, matching the side seams, and sew. I again used a triple stretch stitch, then overlocked


Now all you have left to do is the elastic casings on the sleeve edges (done the same way as the neckline) and hem the bottom edge (and probably give it a press, but hey, its a knit fabric and I'm lazy)


And here it is on. Excuse the bra straps, my only strapless bra is red, and I'm pretty sure it would have shown through the fabric a little with this top.


While it is by no means perfect, it's certainly wearable. I think next time I make one of these tops, I will go up one size, and make the arm holes a bit deeper, as they aren't deep enough to have the sleeves sit on my shoulder, only off (although I do like how it sits) I will also probably make a bit more effort to get my gathers sitting more evenly under my bust. All in all I think it is a pretty cute, wearable top, that I now need in every colour!

If anyone uses this quick pattern hack to make their own brand-name-knock-off peasant top, I'd love to see it!

Dixie

PS. Happy Easter! So far I have spent Good Friday making flat bread and seeing a movie with friends, Saturday relaxing in my pyjamas all day, and today I am just about to head out to a friend's place to go Easter egg hunting with her kids!

Wednesday, 23 March 2016

Easter Basket lining tutorial


With Easter almost upon us, I thought I would take a bit of time away from sewing pretty dresses, and decorate myself a cute Easter Basket instead. Then I thought, even better, how about I make a tutorial for it? I hope you enjoy it!

To begin, you will need:

A basket


I picked mine up last weekend for $2 from an op-shop. I specifically wanted a rectangle base basket, as all the ones I have are round, but this tutorial will work for either.

Some pretty fabric


A lightweight cotton, or even a satin would probably be best, I've chosen to use this piece of lovely pink and white seersucker that I picked up for 50c from an op-shop some time ago, but haven't used yet, as there wasn't enough there to sew a garment from. Depending on the size of your basket and the width of your fabric you may only need less than 1/2 a meter.

Some ribbon


I didn't have any matching pink ribbon in my stash, so I've gone with a white one

Bias Binding


Again, I didn't have a matching pink, so I went with white

Also needed: Some newspaper or tissue paper, a marker or pencil, paper scissors, fabric scissors, measuring tape, sewing machine, some wadding (optional)

Steps by step instructions:

To make yourself a pattern for the base of your basket, use a piece of tissue paper or newspaper, and lay it in the bottom of your basket, using your fingers to crease the paper into the corners.


Using a marker or pencil, trace around the bottom of your basket


Take the paper out of your basket and trim, leaving about a 1/2 inch seam allowance (or however much you prefer) This is now the pattern piece for the base of your lining.


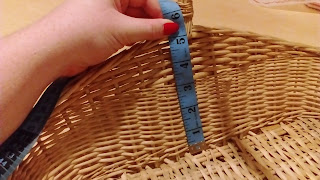
Now measure the depth of the sides of your basket. Mine is deeper where the handle is and shorter at the ends. A basket that is the same depth all the way around will make this part much easier. You will also need to measure the outside edge of the base piece.


My Basket's base is 36 inches around, and my side depths are 3 inches at the lowest and 5 inches at the highest. As my piece of fabric is not huge, I am cutting my piece in 4 pieces and sewing them together, but if you had a long piece of fabric you could do it in one. You want a piece that is about 3 times the length of the circumference of your base piece, for a nice fullness in the gathers.

As my base was 36 inches around, I needed 108 inches in length, with the width varying at points for my 4 sides of the basket. The scribble below shows my planning for cutting, although I added seam allowances to the end making it 6 and 4 inches instead of 5 and 3.


I cut this out of my fabric twice (there's 2 layers of each piece in the below photo) As well as 2 layers for the base piece.


I then sewed them all together in a big loop, making sure the flat edge was all at the bottom.


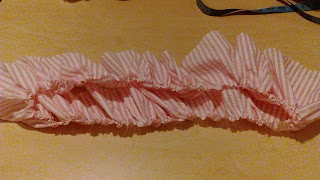
Using my machine's largest stitch setting, I stitched along both the top and bottom edge, then pulled the bobbin thread along the bottom edge (leaving the top for later) to gather it up


Pull the gathering in until it is roughly the same size as the outer edge of the base piece, and distribute the gathers evenly


Pin your gathered loop to 1 of the base pieces, I used my 4 seams to line up with the centre of each edge, making sure the shorter ones were on the ends, and the deeper sides were pinned to the longer sides.


Pin all the way around, adjusting the gathers if necessary, and sew together


Pin the other base piece on top (right side facing in) and sew around, leaving 2-3 inches of one side open to turn through (to be honest I should have left a bigger opening, I struggled to turn mine out)


Cut a piece of wadding a bit smaller that your basket base.


and insert through the opening. It may take a bit of tugging and poking to get it to lay nice and flat where it is supposed to.


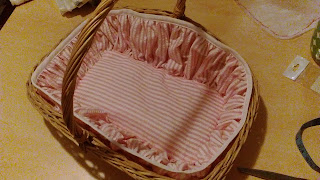
Pu your lining into your basket and pull the gathering stitches along the top edge so that it fits well along the edge. Distribute the gathers evenly around and tie of the gathering stitches so that the size wont change when you take it out and handle it to sew the binding on.


Sew the binding around the top. I haven't taken any progress step by step photos of this, but there are numerous tutorials out there for sewing on binding.


You could finish there if you like, or you could glue your lining down along the edge, or hand stitch it in place, like I originally planned to. Or you can use 2 ribbon ties at the handles to hold the liner in. I cut 2 pieces of 9mm wide ribbon, approximately 30 inches long. This will vary depending on the size of your basket.


Pin the centre of the ribbon to the middle of the liner edge (or wherever your handle are located) I sat my liner in my basket to check placement, then used my machine to sew the ribbons in place.


Put your liner in your basket and tie the ribbons in bows. My bow tying skills leave a bit to be desired......


Then fill with Easter treats! I clearly need to buy more! Or use a smaller basket.


You could add some lace along the edge if you wanted to, or even decorate the handle with some fake flowers. I've left mine quite plain so I can use it all year round, and through into the wash if it gets dirty.

I hope you have enjoyed my little tutorial, I would love to know if anyone uses it to make a basket liner, for Easter or any other time of year!

Happy Easter!

Dixie

Tuesday, 22 March 2016

Kurri Kurri Nostalgia Festival 2016

Just like I do every year, I attended the Kurri Kurri Nostalgia Festival.

This year I unfortunately did not have enough time to sew myself a new outfit like I normally do, as I was hard at work sewing up dresses for Elsie George Boutique, but I did end up wearing a sample of that dress on the Saturday, which was a great way to advertise the newest addition to our range. For the Sunday, I wore my Pink Gingham shirtwaister, as I needed to cover up my sunburn from the previous day (oops) and now it looks like that might be the next design in the new Elsie George range.

I was super excited for this year's festival, as Rachel had been able to secure the stunning Teer Wayde as a guest judge on behalf of Elsie George. As I plus size girl myself, I'm sure you can appreciate how awesome it was to hang out with such a gorgeous plus size model for the weekend.

Teer and I on the Saturday
Rachel and I on the Sunday
The smallest face of Elsie George, strutting her stuff in her
popcorn skirt
I know, not a great shot....


All the pretty Elsie George brand clothing!


Here are a few aerial shots taken by Krystal Sellars from the Cessnock Advertiser (our local paper)


Unfortunately, this weekend marks the end of the Elsie George store in Cessnock, HOWEVER this just means we will have more time and effort to put into our Elsie George brand, which will be available online, with the possibility of personal fittings at a Cessnock location, by appointment only.

We have some pretty huge things in the works, so I am looking forward to sharing all those with you.

Dixie

*EDIT*
Here are a few more photos from my friend Mae