After researching Pink Gingham Dresses for my Pink Gingham Shirtwaister, I just couldn't stop thinking about one of the dresses I came across. This one:

Which I found here on Pinterest. The photo is from an etsy listing that has already been sold. The Pin tells me it sold for $148 (no idea if that was USD or AUS) and the etsy listing has the measurements at a 34" bust and 24" waist.
Not long after finding this one on Pinterest, I was watching a video on one of my favourite blogs, Lavender and Twill, and noticed a very familar dress....
 |
| Find the post here |
A closer look and I realised it wasn't actually the same dress, but gosh darn it is very similar!
 |
| Follow MissBJVear on Instagram |
A week or so later, this photo appeared on her Instagram, showing the embroidered panel on the skirt in quite good detail. At this point I was 100% sure that the dress from Pinterest/Etsy and the dress from Lavender and twill were not one and the same.
Now that I have made one dress with a contrast skirt band, I am itching to make another! I initially thought it would be best to use either plain cotton or another colour gingham, but as I still had the original 2m of Pink Gigham that I was going to use for my shirtwaister, before deciding to go buy 3m of a different pink gingham for it on boxing day, I thought it made sense to just use it. I mean, really, can a girl own too many Pink Gingham dresses?
It is a slightly darker pink gingham than the one I ended up using for my Shirtwaister, so it won't look too same same I hope. For the pattern, I am going to use the waistband pieces from Butterick B6094 and draft the upper bodice pieces using the bodice pieces from the same pattern. The skirt is going to be 2 widths of fabric, each consisting of 3 panels, and the sleeves will be based on the sleeves from my 90's era McCalls 7625, taking some fullness out of the sleeve head and shortening the length. I will document the process of adapting each piece here for anyone wanting to try it themselves.




When it came to starting the embroidery I had so many colours to choose from, but did eventually settle for 2 shades of pink, a green and a cream/ivory. I was lucky enough to find 2 floral embroidery designs built in to my machine that would do the trick. I still have not gotten around to attempting to load new designs from the computer on to it.

I started with the back waistband pieces. I traced the pattern pieces on to my fabric and attached adhesive interfacing to the back, then put the fabric into the hoop and embroidered. I didn't cut the individual pieces out until I had finished the embroidering to make things easier for myself.


I was quite delighted with how it was looking, but then realised I was supposed to put piping in between the bodice and waistband pieces, so promptly unpicked them while the front waistband piece was being embroidered on the machine.

Now that I have made one dress with a contrast skirt band, I am itching to make another! I initially thought it would be best to use either plain cotton or another colour gingham, but as I still had the original 2m of Pink Gigham that I was going to use for my shirtwaister, before deciding to go buy 3m of a different pink gingham for it on boxing day, I thought it made sense to just use it. I mean, really, can a girl own too many Pink Gingham dresses?
It is a slightly darker pink gingham than the one I ended up using for my Shirtwaister, so it won't look too same same I hope. For the pattern, I am going to use the waistband pieces from Butterick B6094 and draft the upper bodice pieces using the bodice pieces from the same pattern. The skirt is going to be 2 widths of fabric, each consisting of 3 panels, and the sleeves will be based on the sleeves from my 90's era McCalls 7625, taking some fullness out of the sleeve head and shortening the length. I will document the process of adapting each piece here for anyone wanting to try it themselves.

For the Front Waistband piece, I shortened it by an inch for my short-waistedness. Most people won't have to do that step. I then traced out my chosen size (for reference I have used Sz 20) I then lowered the top edge of the piece by about 3/4 of an inch on the centre fold side and smoothed the curve out to the other edge

For the Front Bodice Piece, I began by tracing the centre fold line, and the bottom edge from the centre front until the dart, then just one side of the dart.


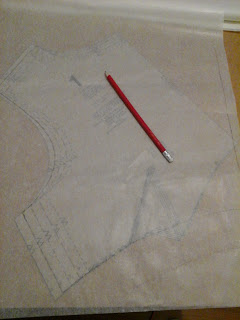
Next, rotate your patter piece (or tracing paper, whichever is easiest) and line up the dart line you traced, over the other side of the dart on the original pattern piece, closing up the dart and opening up the neckline. Trace the rest of the bottom edge, the side seam, armhole and shoulder

Here how it should look when you take away the original pattern piece

extend the centre line down by approx 3/4 of an inch (or however much you shortened the waist band pieces) then draw a curve out from there, joining into the original bottom edge.

As I have made this Butterick pattern before, I know where the neckline sits on me, so I decided to lower it by 5 inches. you could lower it less if you wanted a higher neckline. mine will be a bit lower than the inspiration dress. I simply marked a point 5 inches from the top of the centre fold line, which I will use to draw the neckline.

The dress I am trying to recreate has a very wide neckline and so it doesn't have wide shoulder straps. I decided to halve the existing ones from this pattern down to 2 inches. Again, you can make them bigger or smaller depending on how you like yours.

I then drew a slightly curving line from the shoulder to the neckline

Here's the original pattern piece under the new one just to compare.

The back piece is much easier. Just trace most of it, drawing in a new scooped neckline at the shortened shoulder width and a few inches above where the original pattern piece starts to stick out along the centre back seam. The back waistband piece I just traced straight from the pattern (shortening it for myself)

Then of course comes the Cutting.

The Boy helped.


At this point I stitched together some of the bodice, including the back waistband pieces, I also pinned the side seams and gathered the neckline to make sure it was all working the way I wanted

I was quite delighted with how it was looking, but then realised I was supposed to put piping in between the bodice and waistband pieces, so promptly unpicked them while the front waistband piece was being embroidered on the machine.

So when I finished up the embroidery for the front bodice piece as well, I sewed the side seams of the upper bodice, the sleeve hems and the neckline bias binding. I then sewed the back waistband pieces to the front waistband piece and sewed the waistband to the upper bodice, sandwiching in some piping in between. At this point I tried it on. I stupidly didn't check the fit when I did the gathering on the neckline, so I think I have pulled it in a little too much and made the top a bit tight, but as I am trying to lose a few kilos, that's probably not such a bad thing anyway. It does fit, it's just a s bit snug in front.
At this point I put this project aside to work on other things (a few things for Elsie George and also some cute pyjamas for myself) and I still haven't gotten back into it yet. As I have had this post sitting half written for some time, I thought I would just post my progress so far, in the hopes it will give me the motivation to finish this darling dress.
Dixie


