Saturday, 9 December 2017

New Portia Party Dress by Rebecca Page

I recently tested yet another pattern for Rebecca Page, this time the newest Party Dress pattern, the Portia Party Dress. I made a 3xl, graded to 4xl at the hips (instead of my usual Xxl graded to 4xl at the hips) due to my larger bust and waist from this pregnancy. The pattern can be made in either knit or woven, but I like my woven fabrics, so made mine using a grey poodle print polyester crepe from Gertie's range at spotlight a few years ago.


I made the knee length version, but as I am a bit on the short side, it falls just past my knees. Happily, I did not need to shorten the bodice on this pattern, which is unusual for me. I left the back bodice open, so found I didn't actual need to bother inserting a side zip, which is great, as they usually irritate my skin. I thought the dress had a slight 1940's feel to it, so attempted some victory rolls in my hair, but as I haven't done them in a few years, I was a bit rusty.


Hubby and I went for a bit of a drive around our local area, looking for a new spot to take some photographs. We happened upon a park in one of our town's surrounding suburbs, with a reasonable size pond that had a fairly new looking jetty. Whilst taking these photos, we also got to see an adorable family of black swans, who came over to where we were. I think they were hoping for some food, but unfortunately, we had nothing for them.


This dress is a very quick sew, with minimal pattern pieces, as the sleeves are cut on with the bodice. The trickiest bits are the point in the middle of the underbust seam, and the V neckline, but like every Rebecca Page pattern, this one comes with extensive instructions with full colour photographs to help. Even better, Rebecca Page has decided to release the Knee-Length Knit version for FREE! It is slightly more fitted than the woven version, and all of the tester's dresses I have seen look amazing. I especially love some of the versions I have seen that have been made with stretch velvet, they look so opulent! I think I will be sewing one myself next winter (maybe as a birthday dress?)

Dixie

Monday, 20 November 2017

A Wrap Dress for my Baby Shower

Now that I have finally finished all my University assessments for the year, I can get back to sewing, Yay! About a week and a half after my last assessment was due, I had my baby shower. We had it a bit earlier than I would have liked, in order to avoid the craziness of Christmas and the New year. Naturally I used this as an opportunity to make myself another pretty maternity gown. After trawling through pinterest I knew I wanted a wrap style of dress, but the only wrap dress pattern I had was for knit fabrics, and I really wanted to use a gorgeous floral Japanese lawn that I bought from Spotlight a bit less than a year ago. So, of course, I decided to hack a pattern I already owned, into something suitable.


I decided to use New Look 6123 in a size 18, as it already had a crossover neckline, so I figured it would work. I shortened each bodice by 4 inches, to bring the waistline up to an empire line, then simply cut 2 long 4 inch wide strips for the ties and divided up the rest of the yardage into 3 skirt panels, with the front 2 panels being a bit fuller than the back panel, to accommodate my still growing baby bump.


It all went together very easily, until I got up to pressing the hems on the front edges, and I realised one of the front skirt panels had been sewn with the wrong side facing out! Fortunately (and probably why I made the mistake in the first place) there is not a great deal of difference between the right and wrong sides of this fabric, but it happened to be the front panel that was crossing over in front of the other. I decided to unpick a bit of the opposite side seam on the bodice, so that I could cross it over the other way, and hide the backwards panel behind the other front panel. This was a whole lot easier than unpicking the whole panel and turning it the right way out, especially for a dress I may only get a few months wear out of.

There is some slight gaping in the neckline, and it sits a bit lower than I would have liked, but other than that, I love how the dress turned out, especially as I managed it out of only 3m of fabric. Unfortunately we didn't remember to take many photos with our good camera, so instead, mostly just have photos taken with my mother's iphone 7, and honestly, I cannot see why people rave about them at all, the photo quality is pretty horrendous.

My Grandparents, me and Mum

Hubby and I with his parents

My beautiful sis in law

My crazy bestie
And here is about when we remembered to use the good camera.

Cutting the cake, jellybeans and all.

The only full length photo of my dress

Anyone else done any Maternity sewing lately?

Dixie

Friday, 10 November 2017

Free Maternity Patterns and Tutorials

Seeing as I am now almost up to my third trimester! I thought I would share a list of my favourite maternity patterns and tutorials that I have found online. I really would like to say that I will wear vintage inspired fashion throughout this whole pregnancy, but I know myself better than that. There have already been daggy stretchy comfy clothes. But I will endeavour to keep my wardrobe as cute as I can, with the help of these patterns and tutorials.

This is a list of ones that I think I will use, not just your everyday "cut out the front and put a stretch panel in" or "trace a shirt that fits you". I hope this list helps any other vintage-style, sewing, expectant mothers out there.

Patterns:


The So-Sew-Easy Wrap Dress: A great maternity wardrobe staple if you are comfortable sewing with stretchy fabrics. I would probably shorten the bodice slightly and add more fullness to the skirt. It would also be great for breast-feeding access. There are plenty more free patterns on Deb's site, and many of them could be used for maternity/breastfeeding. Comes in a range of sizes, up to a 44" bust.


The turn about the room dress: A cute dress with a twist detail in front and almost elbow length sleeves. only comes in 2 sizes S/M and M/L, but would be easy to grade.


1950's style Maternity Tops: No explanation needed here as to why I'll be making this one. A basic 50's style maternity top with yoke, facings and gathered fullness.


Contoured Maternity Pillow: I love pillows, and usually have a mountain of them anyway, not sure if hubby will have any room on the bed with this one though...

Any other good maternity patterns and tutorials I should know about?

Dixie
Saturday, 14 October 2017

Tiger Stripes for an Urban Jungle

Recently(ish) for a University assignment, I had to use fabric to create a 3D shape using the theme "Urban Jungle" and some sort of fabric printing. Naturally, I chose to make a garment for my assignment, and drafted up a simple princess seam sheath dress with cap sleeves, using pieces from 3 different patterns, and grading up slightly.

Original Sketch
The center front, center back and sleeve pieces were cut from some black drill from my stash, and the front and back sides were cut from some mystery cotton type yellow fabric I found in the supplies at Uni. I then traced the side pieces onto a very large piece of paper, and drew out my design for the tiger stripes, then cut them out, stuck the paper to a screen and carefully screen printed the stripes onto the side panels. Once the paint was dry, I carefully pressed each piece to set the print, then took it all home to sew together.

Construction was super simple, and I finished the neckline with a scrap of whimsical black and white striped bias binding. Although I had intended to make this dress to fit my pre-pregnancy body, I had included a little too much ease, so when I finished sewing it up, I decided to try it on just to see. 


And wouldn't you know, the damn thing fit almost perfectly! So it seems I can't make things that don't fit, even when I try.

A few weeks after getting the dress back from being marked, a friend's eldest daughter was turning 18, so we headed to the pub for some karaoke (as you do) This was pretty much the only time so far this pregnancy that I have bothered curling my hair and making an effort, so my dear hubby snapped a few quick photos for me (these were actually when I got home afterwards)


20 week baby bump!
I haven't taken many bump photos so far, as I don't really have that cute little bump thing going on, what with being plus size already, but it is starting to look like a proper bump more and more these days (I'm almost 23 weeks now!)

I have a couple of maternity things I have sewn so far, although admittedly not much, my sewing room is a bit neglected these days. So I will be trying to keep posting, however sporadically here. Also, while I have not yet done any more work on my vintage cyclops pram project, my hubby and father-in-law have decided to finish it for me as a father son project, so I will try to keep you all updated on that as well.

Dixie

Wednesday, 9 August 2017

Maternity dress hacked from B6094

Ever since I saw this maternity dress made from vintage Simplicity 3345 on the WeSewRetro blog way back in 2015, I wanted to re-create this pattern for when I eventually needed maternity wear.


As it just so happens, I am now 13 weeks pregnant! (however, I sewed this up some weeks ago when I began showing)


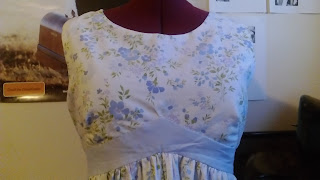
I used Butterick 6094 as the basis for the bodice, bringing the bottom edge of the upper bodice piece up by 4 inches to a point in the centre, replicating that point with the waistband piece as well. The back bodice piece was changed drastically, adding a round neckline and flaring out from the shoulders right down to the hem, although if my fabric was more constrained I could cut the back skirt separately. The front skirt is just a rectangle the width of the fabric, which is cut coming up to a point at the centre, 4 inches higher than the sides. A tie on each side, and a bodice lining is also used. I won't go through the construction, as it is quite simple, but rather, just leave you with some photos of the dress on my mannequin


I unfortunately got a few puckers in the point on the bodice, but didn't bother trying to fix them as I was only sewing this one out of threadbare old sheets as a test of the pattern. I kinda now wish I had, as I have worn this dress numerous times, and the puckers annoy me. I'm also annoyed that I was too lazy to put pockets in this dress, however, it is still a favourite of mine to wear.


I did sew in a short zip at the back of the neckline, but I haven't actually needed to use it, as the flare in the back provides enough room to pull the dress on over my head 


I already have another of these cut out ready to sew, but I have been lacking in motivation lately, as this pregnancy is just making me so darn tired all the time! They say that eases off in the second trimester, so I will hopefully be getting some more maternity sewing done for myself.

Has anyone else made some cute maternity wear? I'd love more suggestions.

Dixie


Friday, 7 July 2017

A Nightie from Burda 7109 and some new vintage patterns

Recently, I found myself wanting a long cotton nightie, so I pulled Burda 7109 out (which I have used previously for pyjamas) as well as a length of floral cotton (purchased from an op shop) as well as a piece of pink lace and some bias binding.


This was a very quick sew, I had it completely finished in one afternoon, so I didn't take any progress photos. The construction is basically just shoulder seams, armhole binding, neckline lace and binding, then side seams and hem. I did add one in seam pocket to the right side of my nightie, as I am constantly needed a pocket to put my phone in, and sleepwear generally doesn't come with pockets. I made a size 22 this time (used 18 in the top last time) as I wanted this to be very loose and unfitted.


I was also super lucky to find 7 awesome vintage patterns while op shopping yesterday morning, for the amazing price of just 50c each! While they are all small sizes, that never deters me, and I know I will be grading some of these beauties up when I next get a chance.


Dixie


Tuesday, 4 July 2017

Scallop front dress from a 1957 Australian Home Journal

I realise my blog has been sorely missing much Vintage sewing content of late, and I'm pretty sure that's why most of you are here, so apologies for the lack of it recently, I will attempt to fix that.

In a bout of procrastination when I should have been studying for my uni exam, I had a look through my fabrics and patterns for my next project, and chose Frock 5048 from the October 1957 edition of Australian Home Journal (the same edition the pattern from my floral green gingham dress came from) as well as a lovely floral poly cotton that I purchased from Lincraft roughly 2 years ago.


As this pattern is for a 40" bust (it's a Matron's frock, but I hardly think she looks matronly) I had very little grading up to do, merely adding a bit of width here and there, But I still diligently traced out all the pieces so I wouldn't damage the original tissue pattern, and would have the graded up version on file in case I want to make this again. I got all my pieces cut out, and started on the bodice darts and tucks, before getting back to my study (and the of course going to my exam)


Once I had finished up my uni obligations for the semester, the very next day I went back to work on my dress. I pressed the bodice darts and tucks, then sewed the shoulder and back neck/under collar seams, eased on the sleeves, attached the cuffs, then sewed the side seams. Next I made the pleats in my skirt pieces, attached the pocket pieces, sewed the skirt pieces together and attached it to the bodice along the waistline seam. I then sewed on the upper collar/front facing pieces, but when it came to turning out all those scallops, I had an idea.


After clipping all the corners and turning them right side out, I cut a piece of cardboard (from a block of lindt chocolate I happened to have on hand) to roughly the same shape as one of the scallops. I then used this cardboard template to insert into the inside of the scallop and push the edges out neatly and uniformly, as I pressed. 


Now I won't say they all turned out perfectly, but that probably has more to do with my stitching than my pressing, but they definitely all look much neater than the scallops on a previous outfit, so I am happy with this technique, and will certainly use it again.


At this point, I put the dress on my mannequin, pinning the front shut, and had a look though my stash for some appropriate buttons. To my dismay, I couldn't find many options that were both a matching colour and big enough size for the scallops. I ended up with 2 options, pale pink polka dot buttons or some medium green buttons, and posted on instagram and facebook to ask for people's opinions. Within minutes, it seemed that the green had everyone's unanimous vote, so I decided to go with that option. By this point it was evening, and I didn't think it was a wise idea to attempt buttonholes when tired, so I left it until morning.

The next day, I sewed the buttonholes, then used them as a guide for placing the buttons, ensuring they would all line up. Then all that was left to do was to sew on the buttons, sew up the front of the skirt and hem it. Unfortunately I did not have enough fabric left over to make a self covered belt for this dress (unless I piece it together) so I am hoping to find a suitable green belt to match the buttons. After wearing out the next day, I realised I will need to add a hook and eye at the waistline at the front, as it pulls open ever so slightly.


I haven't yet managed to get any modeled photos of this dress, as it has been quite cold and wet here for the past few weeks, but I will hopefully update this post when I do.

Dixie